Archive for the ‘Guitar and Gear’ Category
Reverb.com is a new very cool site for those interested in great guitar gear!
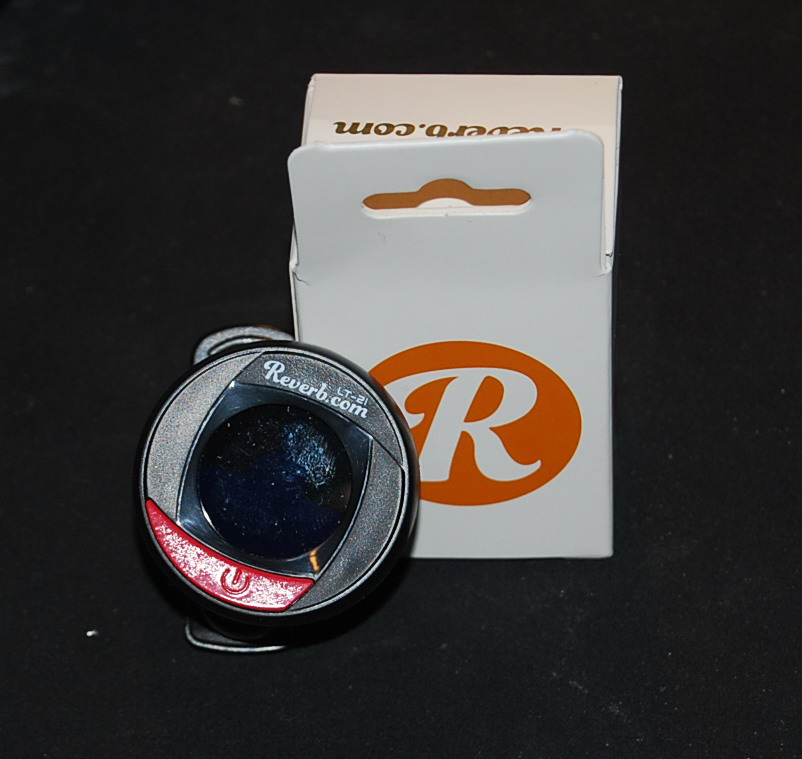
Reverb.com Three Buck Tuner is a NO BRAINER must have guitar accessory!
Reverb.com offers a clip on guitar tuner for three bucks including battery and shipping!!
What initially seemed like a difficult battery install also turned out to be a no brainer! Please read to the end for the “rest of the story”!!!
So Reverb.com offers a clip on guitar tuner for 3 bucks including battery and shipping. So how can they do this? And if so, how good can it really be. The answer to the first question I do not have but I have the answer to the second; excellent!!! A Reverb.com guitar tuner for three Bucks?!! A NO BRAINER!!! And you just might want one!! Here is the scoop.
I thought it simply HAD! to be a piece of junk.
When I first saw this offer I thought I was misreading it or it simply HAD! to be a piece of junk, However, I could not resist the hook and I have thrown away three dollars in hopes of winning the Lottery many times and have lost repeatedly, so why not take a chance? The worst that could happen is I wasted three bucks again in hopes of getting more than I bargained for.
And so I made the purchase on line at Reverb.com. http://reverb.com/ which is a great new company IMHO for gear heads like myself and obviously you guys and gals currently tuned into this rant. Less than a week later it arrived. Upon opening the package I was surprised to see a nice clip on tuner with a firm rubber pads so as not to damage the instrument being tuned. Nice touch, especially in this ridiculously low price range. Also included was the operating instructions and the necessary battery. Would have been nice if the battery came installed as you will now see.
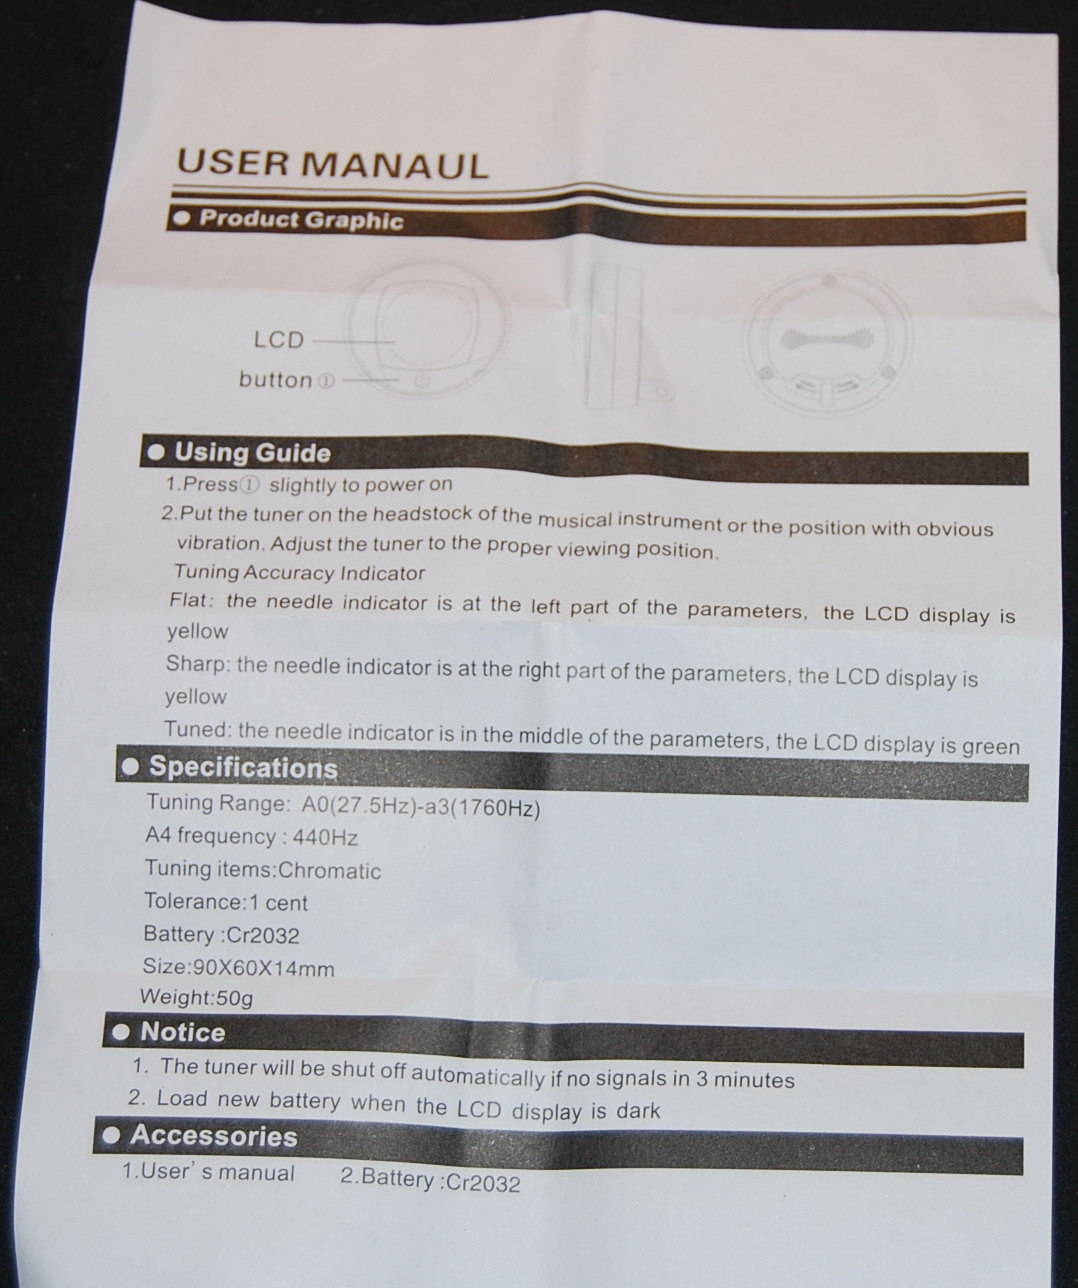
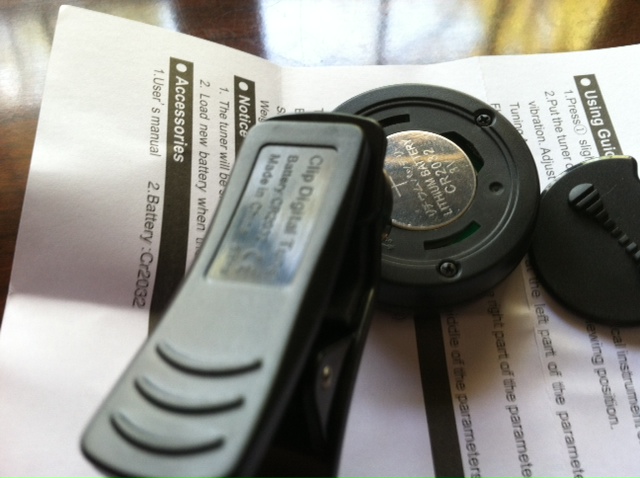
The enclosed instructions included no information on installing the included battery
Battery installation is maddeningly frustrating!
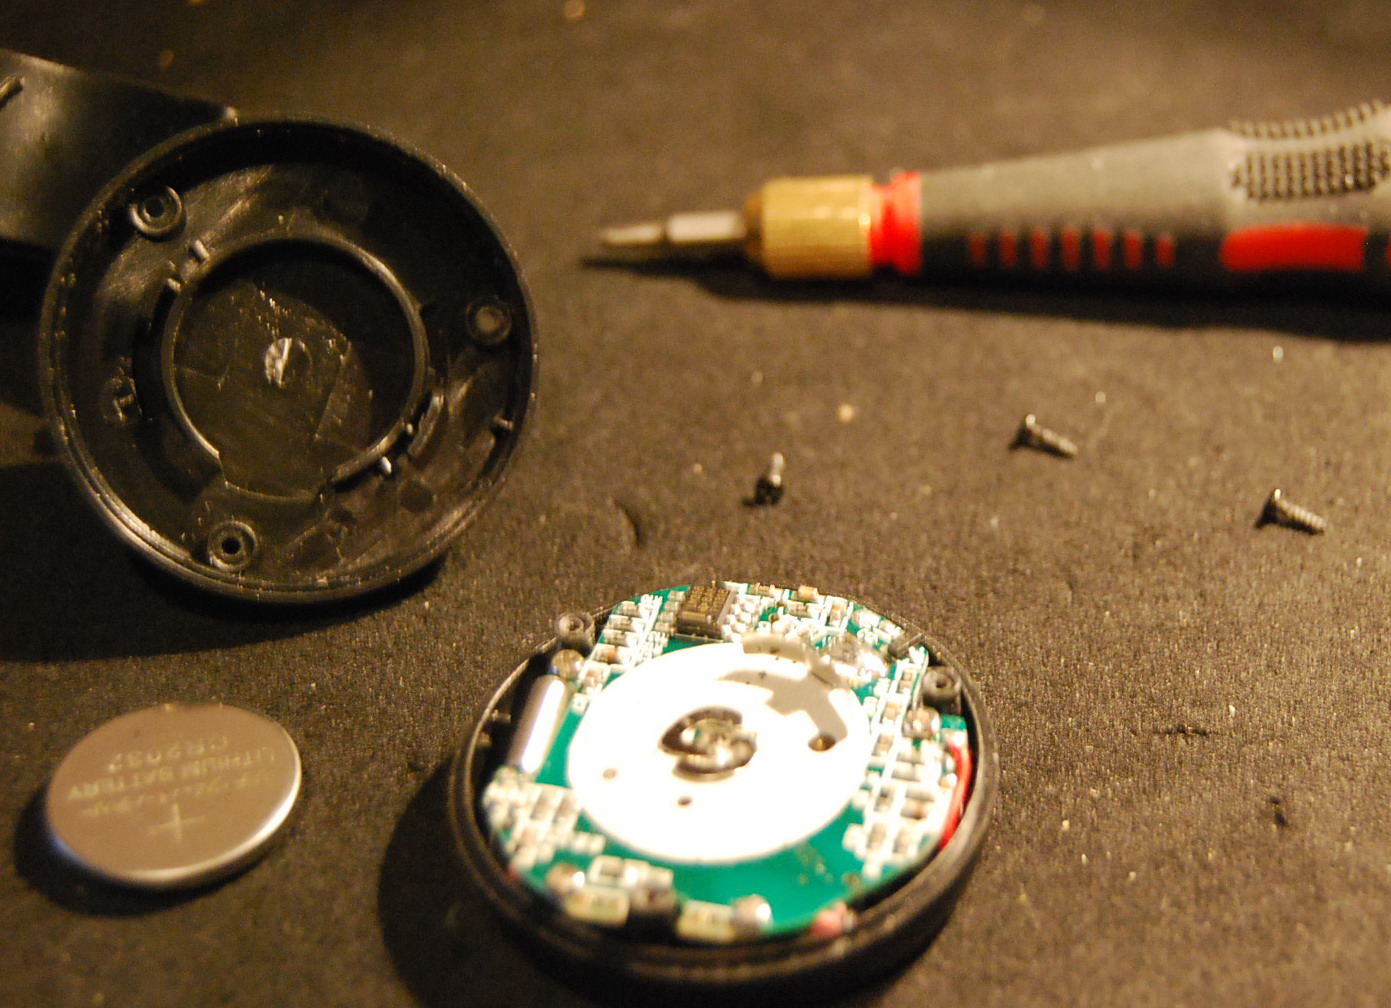
I got out my trusty Philips jewelry screwdriver, unscrewed and popped off the back.Where the battery went became obvious, the polarity orientation was not.
I read the enclosed instructions for the Reverb.com Three Buck Tuner which included no information on installing the included battery. As the back of the case had some raised knurled louvers I tried to slide the back off with my thumb. No such luck. I then tried to turn the cover counter clockwise by grabbing the knurled louvers. Try as I did, still no luck and I feared if i applied any more force, I might break the unit. Then I noticed three tiny screws placed in triangular formation. I got out my trusty Philips jewelry screwdriver, unscrewed and popped off the back. Where the battery went became obvious, the polarity orientation was not. I placed the battery in and nothing happened, turned it over and voila the unit came to life and lit up with a beautiful color display. I consider myself pretty handy at dealing with small stuff, but the battery installation was a bit dicey and quite maddening. As it turned out, you have to get the battery to lean against a raised curved spring bar and then slide the cover on so that it pushes the battery the rest of the way into position and then squeeze to close.
Starting to think that by the time I got it right, I might kill the battery.
This approach took several tries each time powering up the unit. I was starting to think that by the time I got it right, I might kill the battery. Finally or so I thought, I got the battery in and the back on only to find out that my screws were not aligned with the now hidden receptacles. The back comes off again and the battery loses its tenuous position, only to do this all over again this time making sure the screw holes are lined up. Would have been nice if there were markings on the outside of the case to indicate where the screw holes were, but again at this price………
Okay so one more time and it is done!!
“What a piece of junk!!” “good-buy three dollars” was now “good-bye three dollars”???!!
Once powered on (hold the on/off button until the unit powers up, do the same to power off) the unit shuts down by itself in three minutes. I clip the tuner to the headstock of my Epiphone ES339 Pro and I am getting totally erroneous readings. At this point, I am thinking; “What a piece of junk!!” and that my “good-buy three dollars” was now “good-bye three dollars???”!! After taking a pause to say “hmmmmm…”I decided that maybe rebooting this tuner might clear things up now that I knew how to install the battery without a dozen false attempts that might have “confused” its tiny brain. A snap off, install battery, snap on scenario for battery installation would have made a potentially great tuner also a totally legendary experience overall.
Back off the cover comes once again,….. GROANNNNNNnnnnnn.

Liquid Patience puts things into a new perspective!
Liquid Patience……….
I was a half hour into this by 7:30 P:M and was now sensing the need for an adult beverage to take the edge off the growing frustration. A nice cold Miller 64 http://www.miller64.com/ and a shot of vodka http://en.wikipedia.org/wiki/Barton_Brands did the trick by putting things into a new perspective! Liquid patience! I loosen the screws enough to spread the back off so that battery contact is lost and the tuner winks out. I wait about fifteen seconds and squeeze the case closed and with the tuner coming back to life, I once AGAIN!!! Tighten the screws.
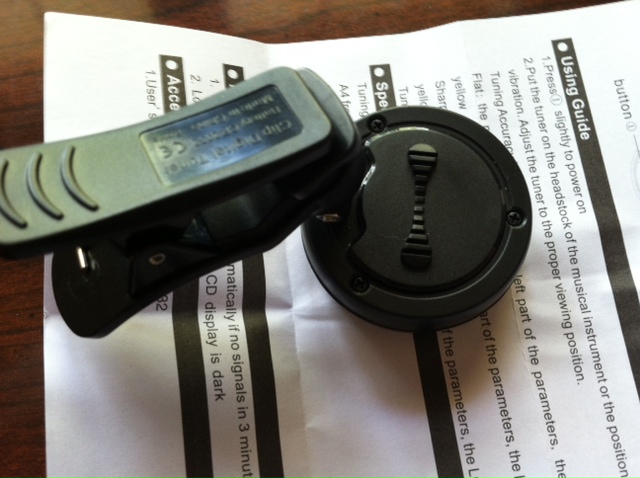
Voila, the tuner locks on like a magnet!
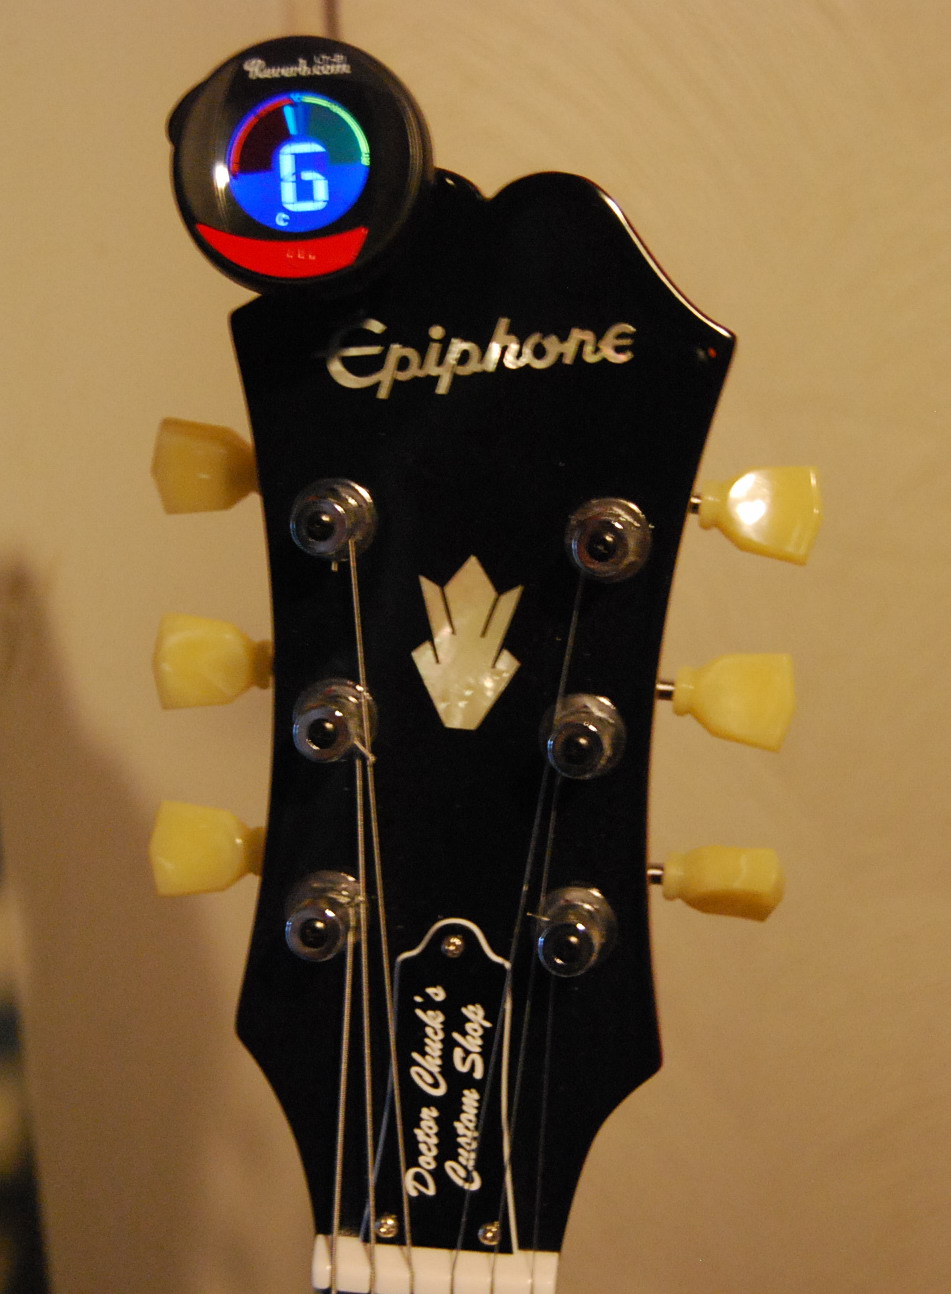
Voila, the tuner locks on like a magnet to each string with its beautiful
color display.

This little Reverb.com
three buck tuner very calmly led me to perfect tuning on every string.
Another pull on the Miller 4 bottle and I attach the Reverb.com three buck guitar tuner yet again to the headstock of my Epiphone ES339. Voila, the tuner locks on like a magnet to each string with its beautiful color display. I guess that rebooting was the thing to do and I am glad I did not give up on it and put it to the curb! Unlike many tuners that maddeningly waver sharp of flat seemingly for no reason, this little Reverb.com three buck tuner A NO BRAINER!! very calmly led me to perfect tuning on every string. In short it works and looks great!!
Includes five modes: C, G, B, V, U (chromatic, guitar, bass, violin, ukulele) to cover the gamut of stringed instruments.
Further info on the display. At the bottom there is a series of letters: C,G,B,V,U that you can access in sequence by quick clicks of the on/off switch. I really could not figure out what purpose it had other than adding confusion to my guitar tuning experience, and there is nothing in the instructions alluding to their function. In any case, if you happen to notice that your tuner is acting whacky and telling you that you are on your “G” string when you are in fact on your “D” string, take a look at the little letter and if it is not the letter “C or G”, click your way to either and restore sanity back to the tuner and to your life. Frustrated I then go back to the original ad to see if I missed anything not included in the instructions. As it turns out I did!! Those little letters NOT explained in the owners manual are indeed explained in the original promotional ad copy which explains that the Reverb.com Three Buck Tuner; A NO BRAINER includes five modes; C,G,B,V,U (chromatic, guitar, bass, violin, ukulele) to cover the gamut of stringed instruments,… duh!!!……
Reverb.com Three Buck Guitar Tuner definitely worth the price of admission.
There is no reason for you NOT to get yourself one!
Now that I have explained how to install the battery, there is no reason for you NOT to get yourself one while the getting is good. At this price and level of performance which is as good as or better than other similar tuners at several times the price, I might guess that they will not last. No excuses! Great little tuner! Period! And now you know why you should get one. The Reverb.com Three Buck Tuner really is three buck Wonder and A NO BRAINER. Order one today!!
https://reverb.com/item/45234-reverb-clip-on-tuner
Just out of curiosity I did a Google search for “$3 guitar tuner” and it seems there is only one to be had!! The Reverb.com Three Buck Guitar Tuner. A NO BRAINER!!!
PROS: Excellent well built tuner with a bright clear color display and unwavering solid string tracking. Amazing, unheard of unbeatable price includes, battery and shipping!!! WOW!!!!!! A must have gear accessory!
CONS: No instructions for battery installation which is maddeningly frustrating until you figure it out and get the knack. Case could have had markings to let you know where the screw holes are which are hidden once you place the battery cover back on. A snap off, install battery, snap on scenario for battery installation would have made a great tuner also a totally legendary experience overall. Instructions should have included information on the tuning modes only explained in the Reverb.com promotional ad copy.
UPDATE!!!!!!!
Two of my buddies got back to me on their experiences with installing a battery on the Reverb.com Three buck tuner. A NO BRAINER!! Buddy number one experienced a bit of difficulty until his son, obviously with better vision pointed out the little symbols his Dad and I had missed….
<<So my tuner arrived the other day and I spent about an hour trying to get the battery in, which I was finally able to do, but not before dropping one of the (tiny) screws on the floor and not being able to find it until I swept the floor the next day. After I put the screw in, I explained to my son how ridiculously difficult it was to put the battery in. He looked at the tuner and said, all you have to do is screw off the back. OMG! Look at the back and, where the tuner mounts to the clip, on the left it says “OPEN” with an arrow pointing clockwise, and to the left it says “CLOSE” with a CCW arrow. It’s VERY difficult to see, but it’s there, and the back does indeed come off when you turn it CW. Check it out.
Buddy number two also pointed out the desired way to install the battery while also being so “kind” as to praise my blog and to suggest a topic for my next post. (Grooaaaannn…..)
I guess there were no battery loading instructions because it’s blatantly obvious how the compartment opens. So much for the value of your blog. I guess anyone with enough time on their hands to endure reading your blog can well afford to follow your instructions. Your next post should educate your readers (on) how to open their guitar cases by removing the hinges!… >>
Reverb.com Three Buck Tuner. A NO BRAINER! Back cover unscrewed off.
Reverb.com Three buck tuner. A no brainer!!! Back cover replaced.
Liquid Patience puts things into a new perspective!
So as can be seen, I get by with a little help from my friends…….In any case, despite failing at first to notice the tiny “open” and “close” designations, I did indeed at first try the intuitive method of unscrewing the knurled back to open it up. Would not budge with what I thought was a very ample amount of force, and for that matter still will not as I tried again with most ample force. I suspect buddy number two’s Reverb.com Three Buck Tuner unscrewed quite a bit easier otherwise he might have unscrewed it like buddy I and buddy number one did. For three dollars I may throw caution to the wind and try once more, maybe with a channel lock pliers and see what happens. Hahaha!!… Hmm… maybe not…………. In any case, despite the inadequate instructions, this Reverb.com 3 Buck tuner is a great deal and a NO BRAINER! Get one while the getting is good!!
The Plot Thickens……..That the back of this tuner was counter conventional never occurred to me, duh!
Good thing I did not take myself seriously with that there channel lock pliers and forcefully try to unscrew this darn thing. Sometimes childish ignorance is bliss and an advantage. Turn one way, then turn the other until it opens is a naïve but obviously very effective approach. From countless hours tinkering with nuts and bolts and anything that requires using screw drivers I am programmed towards convention almost to a fault ( righty tighty, lefty loosey) That the back of this tuner was counter conventional never occurred to me where as a child, with no preconceived notions might find the solution in a child like manner that I failed to see. The few things that I have encountered with reverse threading also had instructions that pointed this out. I never expected this in a guitar tuner as there is no advantage in doing this. So in the end I love the tuner but the owner’s manual leaves a bit to be desired. No instructions on battery installation and tuning modes and the fine print on the tuner itself was extra fine. The main thing is that this Reverb.com Three Buck Tuner is a great tuner at a great price. No regrets!
So simple….“Why didn’t I think of that?!!”
Once in a while something really simple in concept come along that is executed so excellently that it beckons the question; “Why didn’t I think of that?!!” The Jekeko Wah fixed variable wah is one of those simple but great devices.

Jekeko Wah Fixed Variable Wah Pedal. Find and “park” your tone!
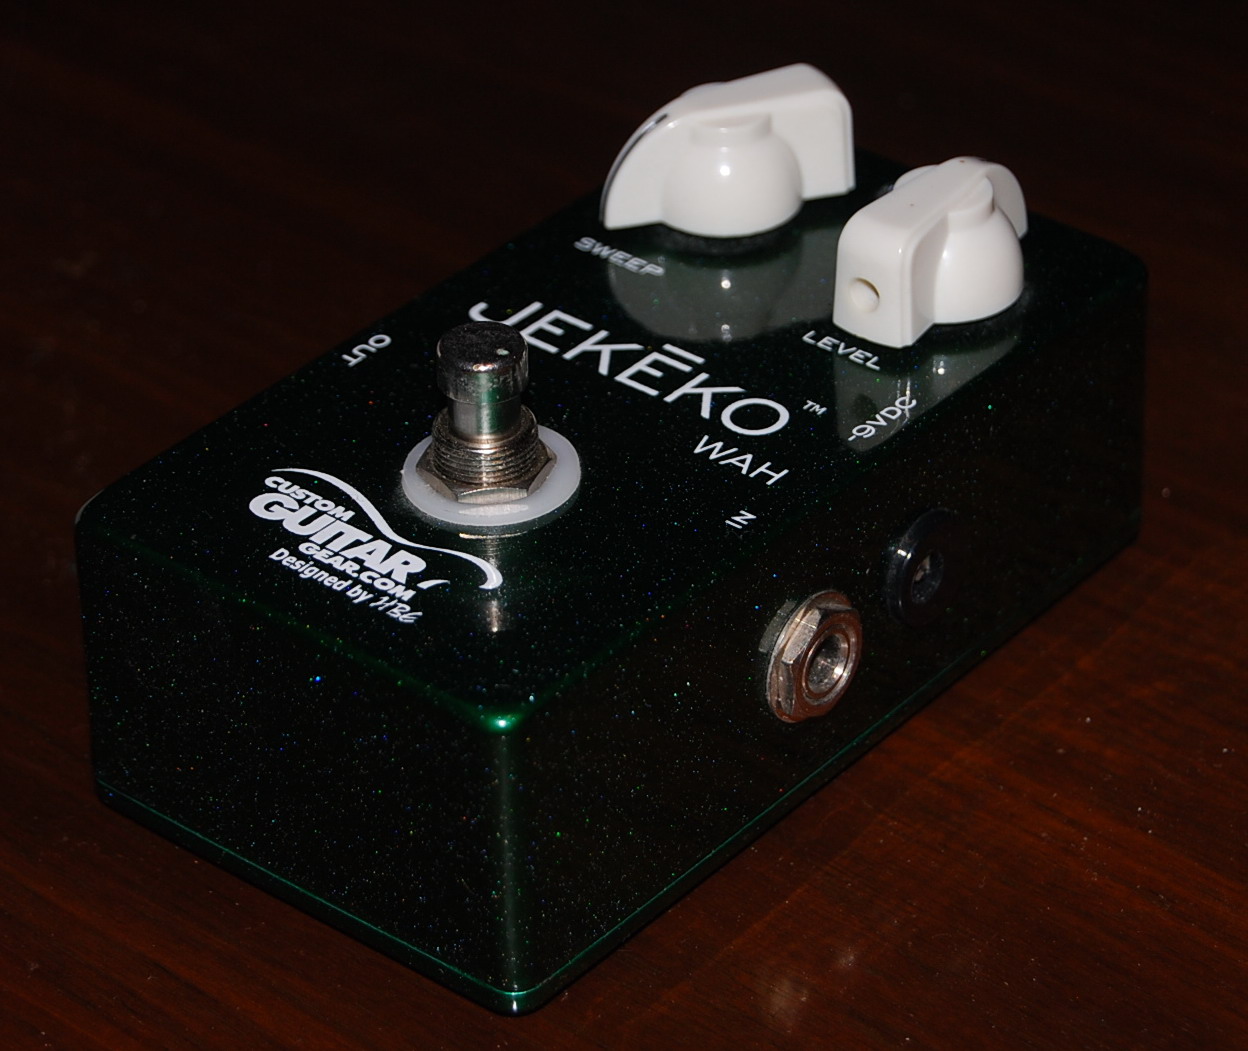
Jekeko Wah Fixed Varible Wah Pedal. Photos cannot capture the beautiful Sparkling Emerald Green.
All of us have played through wah pedals at one time or another and appreciate the sound of the physical movement of the pedal as an extension of our emotions as translated into guitar leads. Yes, the original wah concept was an enormous addition to what at the time was a quite Spartan array of available effects; i.e. reverb, tremolo, ( the very cool pitch changing vibrato unique to Magnatone amps ), and the fledgling fuzz. This was a game changer. Between the extremes of the available range on the wah pedal there also was a plethora of available tones to be experimented with and enjoyed in between. And so not only did we want to simply to wah/wah away ad infinitum, we wanted to get tones that were otherwise unavailable and we did so by being able to simply find a good setting, leave the pedal there because with the Jekeko Wah you can “Park” your tone!
Capture the famous Vox Super Beatle Amp MRB magic and get John Lennon’s hollow “I Feel Fine: lead tone.
My original wah pedal was a Vox and I loved it. Funny how when I was a kid and had to save up for my toys that I was never reluctant to loan them out. Yep I really loved that Vox wah until it was never returned to me. That hurt!! Anyway, one of my favorite things that I used to like to do with this pedal was to simulate the mid range boost or “MRB” magic of the famous Vox Super Beatle Amp and get John Lennon’s hollow tone as used for the intro lead on “I Feel Fine”. This tone was also used elsewhere by The Beatles and to me it was ultra cool. So I would engage the wah and slowly treadle the pedal until I hit what I thought was the best approximation of the sound, “park” the pedal and play away. It really did sound great!
“Park” your tone!
Okay so now you get the premise about “parking” your tone. The problem is that this is kind of awkward to do in the middle of a song to say the least. Wouldn’t it be nice if there was a pedal that you could simple dial in whatever tone in the wah spectrum you were looking for, park your tone, and then have it set and ready to go all with the push of a foot switch? Enter the Jekeko Wah! http://www.customguitargear.com/customguitargear-jekeko-wah-manual-fixed-adjustable-wah-pedal/This pedal is exactly what I was looking for and I assume what you boys and girls also might be looking for as well. This pedal allows you to park your wah tone anywhere and also boost it as well. So simple but so effective. There are also internal adjustments allowable to further tweak and personalize this pedal but even as is, I love it. An LED to let you know when the pedal is engaged is also a nice touch, and for the purists the foot switchable circuit is a true bypass design.
Jekeko Wah. Fixed Variable Wah. expensive but worth it.
A metal bud box style cabinet finished in sparkled deep emerald green that offsets the white chicken head knobs, no photo seems to do this pedal justice. In any case it will take up relatively little space on your pedal board and is one those superior pedals that at $189.00 plus shipping fall into the category of expensive but worth it and because you drink Miller 64 instead of expensive Heinekens you know you won’t feel guilty for wanting it. So go ahead, add one of these great Jekeko Wah Fixed Variable Wah pedals to your arsenal find that great sound and “Park” your tone!
For further study:
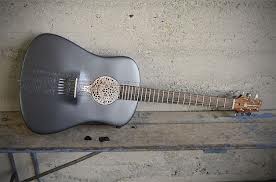
As 3D printing is a relatively new phenomena there is a lot of excitement going on about all the possibilities this process opens up. So the question to ask is 3D print a guitar? Answer; Absolutely!!! 3D Printing also known as Additive Manufacturing is a process where successive layers are laid down or “printed” in different shapes until a pre-programed object emerges seemingly out of nowhere. The applications of this process seem to be never ending. From machine parts to revolvers, to body parts, loud speakers and beyond. Now a new generation of printed guitars are coming about and they are truly very cool and inspiring. Of course at this stage, it is mostly the bodies that are 3D printed while a lot of conventional manufacturing still goes into the rest of the process.

Successive Layers are laid down or “Printed”
The guitar bodies are 3D printed. Conventional materials are also used.
As Olaf Diegel states in an article by Todd Halterman October 20, 2013 “On A High Note – Olaf Diegal’s 3D Printed Guitars: http://www.3dprinterworld.com/article/high-note-olaf-diegels-3d-printed-guitars ;
“Look at my guitars. The bodies are 3D printed, but the necks and inner cores are CNC machined. The bridge and tuning heads are cast. My inlay is done with laser engraving and cutting. Some of the plastic bits are injection molded. They use almost every manufacturing technology under the sun.”
The electronics and hardware on these creations are still pretty much standard fare but that takes nothing away from the collective endpoint that results in a truly functional work of art where the imagination is the limit and the coolness factor unlimited.
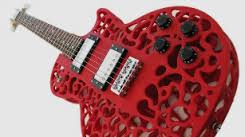
The Les Paul bodies are 3D printed, but the necks and inner cores are CNC machined
A very cool 3D printed acoustic guitar.
In fact there is a very cool 3D printed acoustic guitar as well!! http://www.businessweek.com/articles/2012-10-11/the-worlds-first-3d-printed-guitar.
Very cool 3D printed acoustic guitar
3D Printing. The Future is Today!!
As it turns out this process of 3D printing is poised to be a real game changer not only in general but for guitar manufacturing as well. This is just the beginning. Possibly very soon, the entire guitar; body, neck, pickups and wiring might be created simply by programming your computer to do so. Want a Les Paul, Stratocaster or Telecaster? Grab a Miller 64 and hit the “print” button!!!
Behold! The future is today!!
For further reading:
http://cubify.com/products/guitars/
http://www.odd.org.nz/atom.html
http://www.guitarworld.com/another-dimension-odd-3-d-printed-guitars
http://www.businessweek.com/articles/2012-10-11/the-worlds-first-3d-printed-guitar
Ibanez RS1500. Fender Strat Killer?! You decide!!
So what are you thinking …………?
Never gonna happen!
Quite possibly?
Could have been?
Dr. Chuck has lost his friggin’ mind to Miller 64?!!
Well it is time boys and girls to grab a cold one and once again dig into another RANT……
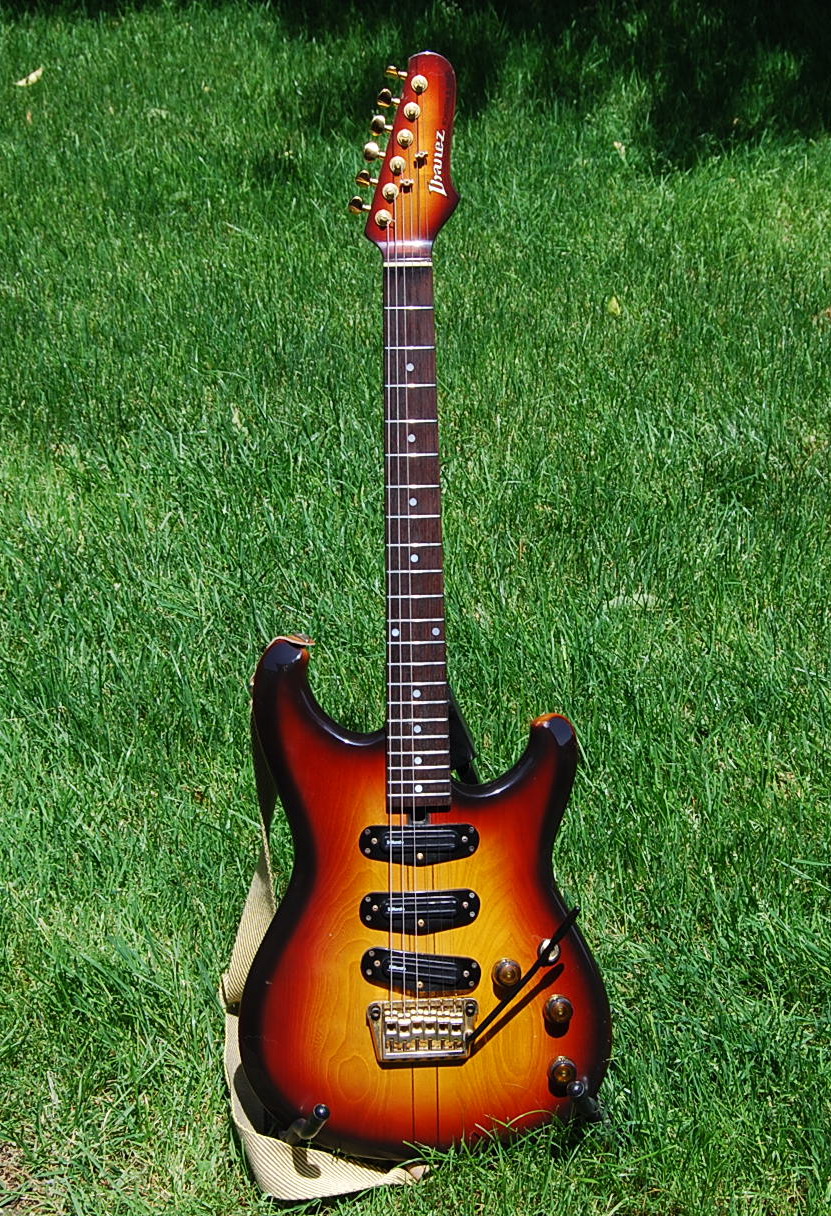
Ibanez RS1500! Strat Killer?!
For all those that are not acquainted with the Ibanez RS1500 and all those who swear by the Fender Stratocaster, prepare to have your mind set altered or at least enlarged. I am not looking to simply make converts to this guitar by endorsement or make you swear off your beloved time proven Fender Stratocasters. Also Ibanez does not know me from dirt as does the Hoshino Corporation that was their founding fathers. I have nothing to gain with the following story about one of the most amazing guitars I have ever played and so now the playing field is leveled.
Years ago either before I entered dental school, or during my initial tenure, during summer vacation I took a day trip to Manhattan ( New York City ) for those that are unitiated . Yes, I know there are other cities labeled as Manhattans, but only one is New York City, okay?!) I arrived at 48th St., the guitar Mecca of New York and possibly the world. Me and my friends went GAGA over the guitar and gear offerings!! years before before the most beautiful and talented Lady Gaga coined the term, gulped our breath and drooled over the amazing guitars and gear available at the time to us for only if we had oodles of money.
Real wood topped guitars with minimal pickguard are a thing of beauty!
I always loved real wood topped guitars with minimal pickguard as was becoming more popular by Gibson Les Paul aficionados to leave their pickguards at home instead of mounting them, I loved that Les Paul without a pick guard fanfare a la Dicky Betts, yet always loved Fender Stratocasters and Fender Telecasters as well and wondered what they might look like without a slab of plastic on the top and whether it might even be an improvement. Would they still capture the Fender Stratocaster and Fender Telecaster
“vive” sans pickguard?
At that time, I was dreaming about a Stratocaster with a truncated pickguard to allow the wood grain to show through or NO pickguard at all, perish the thought? I thought that concept would be so cool!I was imagining a Fender Stratocaster with uber wood showing through and no pickguard. Didn’t exist at the time. Oh well………….
Manny’s, Rudy’s and Sam Ash in New York City. A gear Mecca!!
Take a trip to NYC simply to lust over the many things in Manny’s, Rudy’s and Sam Ash that I could not afford and I happened along an Ibanez RS1500 in what I call vintage sunburst,.. howver, I did not know that at the time because the first thing that grabbed my noodle was the body that at first grasp absolutely looked Fender Stratocaster, yeah? Strat style body, 3 Strat style single coil pick up set up most correctly meaning the neck and middle pickup wer parallel to each other but the treble pick up had that cool slant downward towards the bridge which was designed to get every fractrion of an ounce of treble bite out of the strings way back when when George and Leo designed this puppy? Then as I fantacized there was NO pickguard!!!!! Just these really cool frames to bolt and hold the pickguards in place at the proper positions while allowing the beautiful ash wood in between to show case unblocked by a big pickguard. To me at that time this was a HUGE design step forward by Fender. Then I looked at the headstock and realized it was not a Fender Stratocaster at all , but instead a very beautiful state of the art Ibanez RS 1500.

Ibanez RS1500. Fender Strat Killer?! “Crafted in Japan”.
“Crafted in Japan” just oozes a quality vibe that makes one warm and fuzzy!
The Ibanez Roadstar RS1500 is made with a nice resonant Ash body with a maple neck through with a rosewood finger board with a 25.5 scale. The neck through aspect is very similar in appearance and feel to the Carvin DC400. See my post: Carvin Guitars: Why you will soon want one!! This means a very comfortable feel and effortless upper fret access. So here I was ogling this beautiful instrument, wanting it very badly, and simply knowing that one day I would own one. And speaking of the headstock, THIS was the Ibanez headstock that I fell in love with. Fenderish enough to look the part, but not at all a law suit plagiarized copy by a long shot. In fact, to me the Ibanez Roadstar headstocks are the most beautiful of any that Ibanez ever offered. The current fondue fork inspired Ibanez headstock does absolutely NOTHING for me, as do the fluorescent construction paper inlays and a cut out hand grip. Hey! To each theie own; they are simply not my style. I’m a more traditional guy. Gotta love the headstock label where it proudly proclaims in an understated way, “Crafted in Japan”. Not simply “made in Japan, but crafted in Japan. That just oozes vibe and gives one that fuzzy feeling of being the proud owner of such a fine instrument as an Ibanez RS1500.
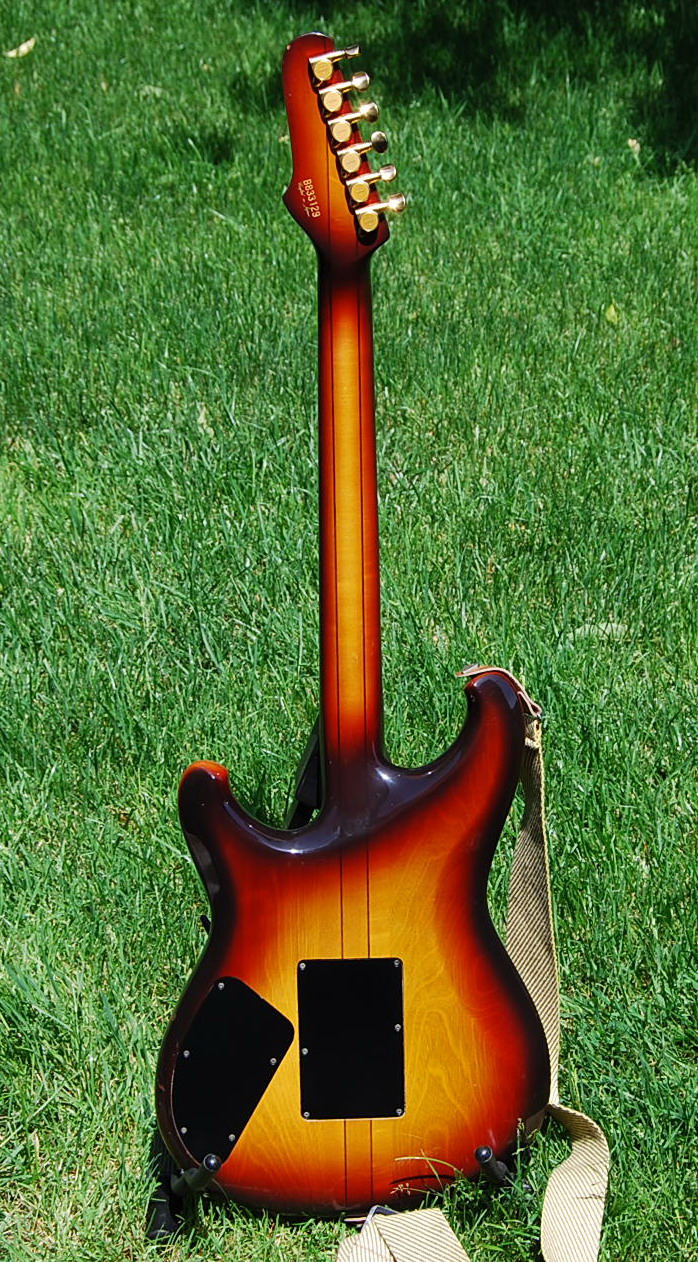
Ibanez RS1500 Strat Killer?! Showing a beautiful maple neck through Ash body
Was I disappointed it was not Fender who presented this most beautiful guitar. Not at all, and also just a tiny bit surprised. When I worked briefly at Sam Ash in the mid 1970’s before being fired by da bastid Mel Fieldz which will be a subject of a future rant, Ibanez was in the depth of producing their law suit guitars and were constructing instruments of surpring quality with more care than Gibson. At that time in the midst of their dreadful “Norlin years” when Gibson was taken over by unmusical bean counters, these interloper rogues almost put the, (can you believe it??!) premier producer of electric guitars; Gibson, out of business!! Coincidentally, Fender had just been taken over by CBS and was also facing their quality doldrums as well. This topic of the Gibson/Fender “dark years” will be the topic of another rant so keep tuning in boys and girls!!
After I realized that this was not a Fender guitar and accepted that it was yet another undeniably excellent offering by the relatively new Ibanez company, I lusted over it for the next umpteen years until I finally after searching the internet and Ebay a few short years ago came across one. Not perfect, but close. You guys know how I feel about “pristine”,… but as I said,this one was close, and so as rare as they were, I went for it with a vengeance. I simpy WANTED this guitar and nothing was going to stop me,…errr,.. that is , as long as I didn’t run out of money,…
This was before the recession hit and ruined everything for sellers. Anyway, they were going for around $1200.00 before Obama was elected. I sniped for $899.00 and was feeling really proud myself as I won the auction, maybe because the listing ended at 3 A:M
(who stays up that late on a weeknight except Mr. Snipe Program, anyway?) or maybe because it had some minor body damage. Who knows? In any case, for that period in time I scored well and I will at this point ride the present economy out rather than sell at a loss as this guitar is amazing and you will soon find out why!
So what sets this guitar apart from the rest of the Fender Stratocaster inspired instruments, so much so that I call it; “Ibanez RS1500/Fender Strat Killer?!! To me above and beyond the excellent quality, the neck through design and the lack of a pickguard that allows the beauty of the ash wood to show through, the most important feature was the very unique wiring harness that allowed infinite tonal tweaking on the Fender Stratocaster kind of theme. And so following I will explain this unique set up which by the way does NOT rely on any active circuitry but is instead totally passive.
First as a base line, let us basically explain the Fender set up. http://www.fender.com/news/the-stratocaster-pickup-selector-switch/Fender has a master volume control, two tone controls, and a 5 position slide pickup selector switch. Position 1 is the treble pick up only, position 2 is the treble and middle pick up, position 3 is the middle pick up, position 4 is the middle and neck pick up, and finally position 5 is the neck pickup only. The middle pick up is reverse wired and so when you are in positions 2 and 4 you are fully out of phase. Position 2 is the bridge pickup/middle pickup combination, and Position 4 is the middle pickup/neck pickup combination. These 2 and 4 or “in between” settings give that classic Fender spank or “quack” as some put it. Very cool tones or very bad tones depending on your point of view. They are sometimes referred to as “Knopfleresque” tones because Dire Straits Mark Knofler has his signature tone based on these settings. I love the sound personally, however I really wished the settings were adjustable from slight quack to full quack. I think that would make for some interesting variable flavors within the realm of Knopfleresquedom, yes? That Fender Strat five position switch is pretty much all or none though.
As a side note, as originally designed, the Fender slide switch only had three positions, bridge, middle, neck. Apparently it was accidentally discovered that if you carefully balance the springiness of the switch to setting in between which later became designated as 2 and 4, you could get these really unique tones that Fender really never had in mind in the first place. Players would then open up the guitars and hot rod the switch by filing a notch in those 2 and 4 areas to grab the switch and hold it in place. Eventually Fender caught on and by popular demand started to make the 5 position switch standard. This sort of serendipity reminds me of how on the Hammond B3, the manufacturer initially considered the classic “key click” as an annoying unwanted defect, now so beloved by Hammond players that Hammond organ emulators strive to duplicate this “defect” in the quest of authentic Hammond B3 tone,….
And so I digress. So let’s get back to topic okay? Manoman, give this guy a couple of Miler 64’s and he jumps ship all over the place!!! Sheesh!!!
Fender Strat flavor that would make Mark Knopfler smile!
For further study:
http://fattoneguitars.wordpress.com/2010/10/27/how-mark-knopfler-got-his-groove/
Alrighty then! First glance of the knob layout of the Ibanez RS 1500 doesn’t grab you like it is something out of the ordinary. Not at all. Without the 5 position selector switch of a Fender Stratocaster, it actually looks limited compared to what you would expect to dig up totally on a Fender Strat. The set up actually resembles something that you might find on a Gibson Les Paul even more than a Fender Strat. For starters there is a volume control for both neck and bridge. Turns them BOTH up or down simultaneously. There is also another volume control that is strictly for the middle pick up and also a master tone control. Finally, there is a toggle switch that pretty much acts like it would on a Gibson Les Paul. Okay, for starters, let us turn the middle pick up all the way down and the volume for the neck/bridge pickups all the way up. Flick the toggle towards the bridge pick up and you have,.. the bridge pick up. Flick the toggle to the neck pick up only, and well,.. you have the neck pick up only. Flick it to the middle and you have both neck and bridge pickups. So far no great surprise, very Gibson Les Paul like, and straight forward.
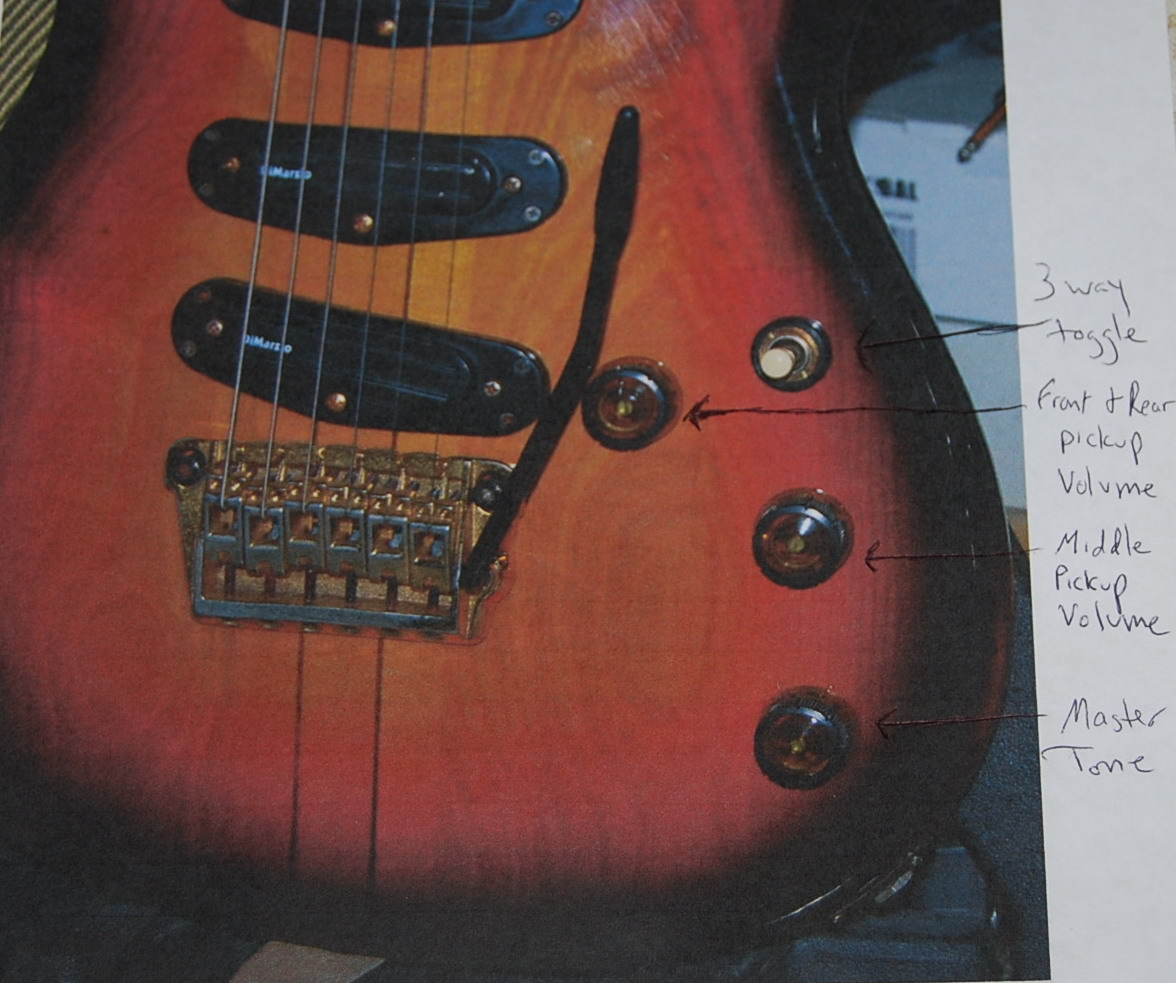
Ibanez RS1500. Fender Strat killer?! Controls designation
With the above pickup designations explained, here is where the magic starts. Remember I said the middle pick up has its own volume. This is key as the middle pickup is reverse wired like on the Fender Strat. Now let us turn the neck/bridge pickup volume down and turn the middle pick up volume while placing the toggle in the middle. Guess what? You get the middle pickup but it is silent!!! So where am I going with all this stuff? Well remember I said the middle pickup is reverse wired. Let us go back to the original setting where the neck/bridge pickups are engaged, for instance with their volume control dimed. Now you incrementally bring up the middle pick up. As you do, a really cool thing happens. You start to dial in some out of phase Fender Strat “quack” so characteristic of the Fender Stratocaster. Now this is not a Fender Strat like on or off scenario but rather gradations as you turn that middle volume knob anywhere from full off to full on. Boys and girls, there is a whole lot of out of tone flavors going on in between the extremes from slight quack to max quack. VERY, very cool indeed.
Let’s take this further. Again, turn the middle pick up off and flick the toggle to the treble position. Full straight forward treble pickup. Now start to bleed in that middle pick up and you start to again bring on the out of phase quack from subtle to full bore or anything in between. Now repeat this scenario starting with the neck pick up only and start to bleeding the middle from just a touch of quack to again full bore. I think that now you are getting the picture. These settings not only mimic the static one flavor only out of phase positions 2 and 4 on your beloved Fender Stratocaster, they actually expand upon 2 and 4 with infinite variability of intensity of the, if you will; “effect”. This wiring scenario of the Ibanex RS 1500 is HUGE! You can spend hours with this passive circuit tweaking and twisting to arrive at “your” sound!! I just love it. You can also try diming the middle pick up and then bringing the neck/bridge combo incrementally up resulting in ever more killer tones! And so the middle pick up on the Ibanez RS1500 with volume turned off is in stealth mode just wating to attack a Gibson Les Paul like tone stack in any pick up combination with Fender Strat “quack’!!
The best of both worlds! The only thing that might make this better is to have coil tapping humbuckers at all positions or at lest neck and bridge. As it is one could spend eons experimenting with tone, imagine adding in a sense three more accessible pickups?!!! Well, as it hasn’t been done yet at least to my knowledge, it is time once again to put down the Miller 64 http://www.miller64.com/

Breakfast of Champions
and get back to the business at hand.
So now you see that the Fender Stratocaster wiring is kind of “black & white”, in comparison to the “NBC peacock” of living color by comparison to the Ibanez RS1500.
The seldom seen Ibanez RS1500 is my favorite of the Ibanez Roadster series. Extremely well built, gorgeous, and tonally versatile to the extreme in a Fender Strat flavor that would make Mark Knopfler smile! For more images and information on the Ibanez RS1500 and others of the most beautiful Ibanez Roadstar line click on the following links:
http://www.ibanezcollectors.com/discus/messages/14/4052.html
Now you know why I pose the eternal question; Ibanez RS1500. Fender Strat Killer? You decide!!