Reverb.com is a new very cool site for those interested in great guitar gear!
Reverb.com Three Buck Tuner is a NO BRAINER must have guitar accessory!
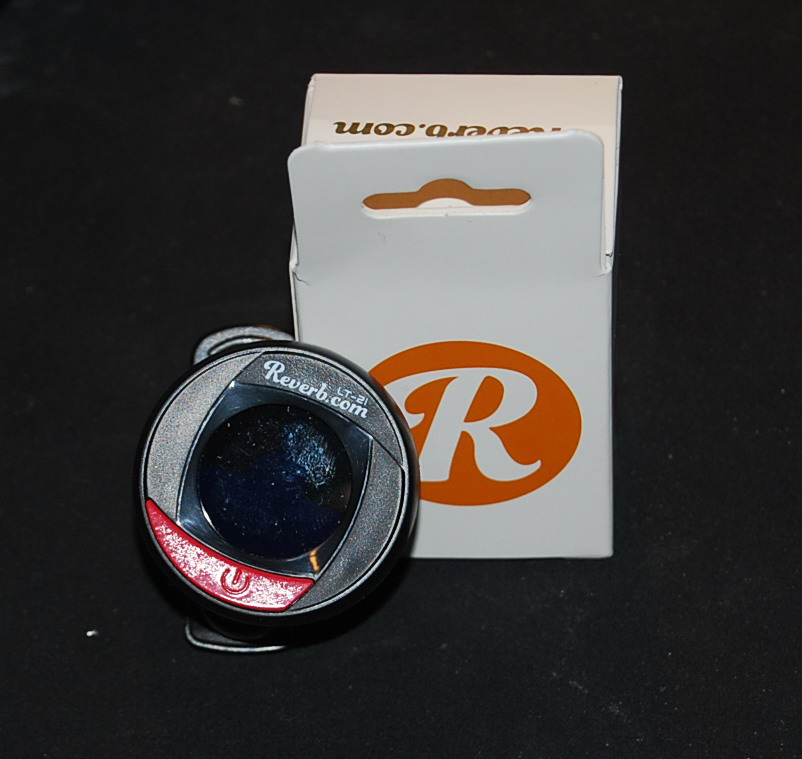
Reverb.com offers a clip on guitar tuner for three bucks including battery and shipping!!
What initially seemed like a difficult battery install also turned out to be a no brainer! Please read to the end for the “rest of the story”!!!
So Reverb.com offers a clip on guitar tuner for 3 bucks including battery and shipping. So how can they do this? And if so, how good can it really be. The answer to the first question I do not have but I have the answer to the second; excellent!!! A Reverb.com guitar tuner for three Bucks?!! A NO BRAINER!!! And you just might want one!! Here is the scoop.
I thought it simply HAD! to be a piece of junk.
When I first saw this offer I thought I was misreading it or it simply HAD! to be a piece of junk, However, I could not resist the hook and I have thrown away three dollars in hopes of winning the Lottery many times and have lost repeatedly, so why not take a chance? The worst that could happen is I wasted three bucks again in hopes of getting more than I bargained for.
And so I made the purchase on line at Reverb.com. http://reverb.com/ which is a great new company IMHO for gear heads like myself and obviously you guys and gals currently tuned into this rant. Less than a week later it arrived. Upon opening the package I was surprised to see a nice clip on tuner with a firm rubber pads so as not to damage the instrument being tuned. Nice touch, especially in this ridiculously low price range. Also included was the operating instructions and the necessary battery. Would have been nice if the battery came installed as you will now see.
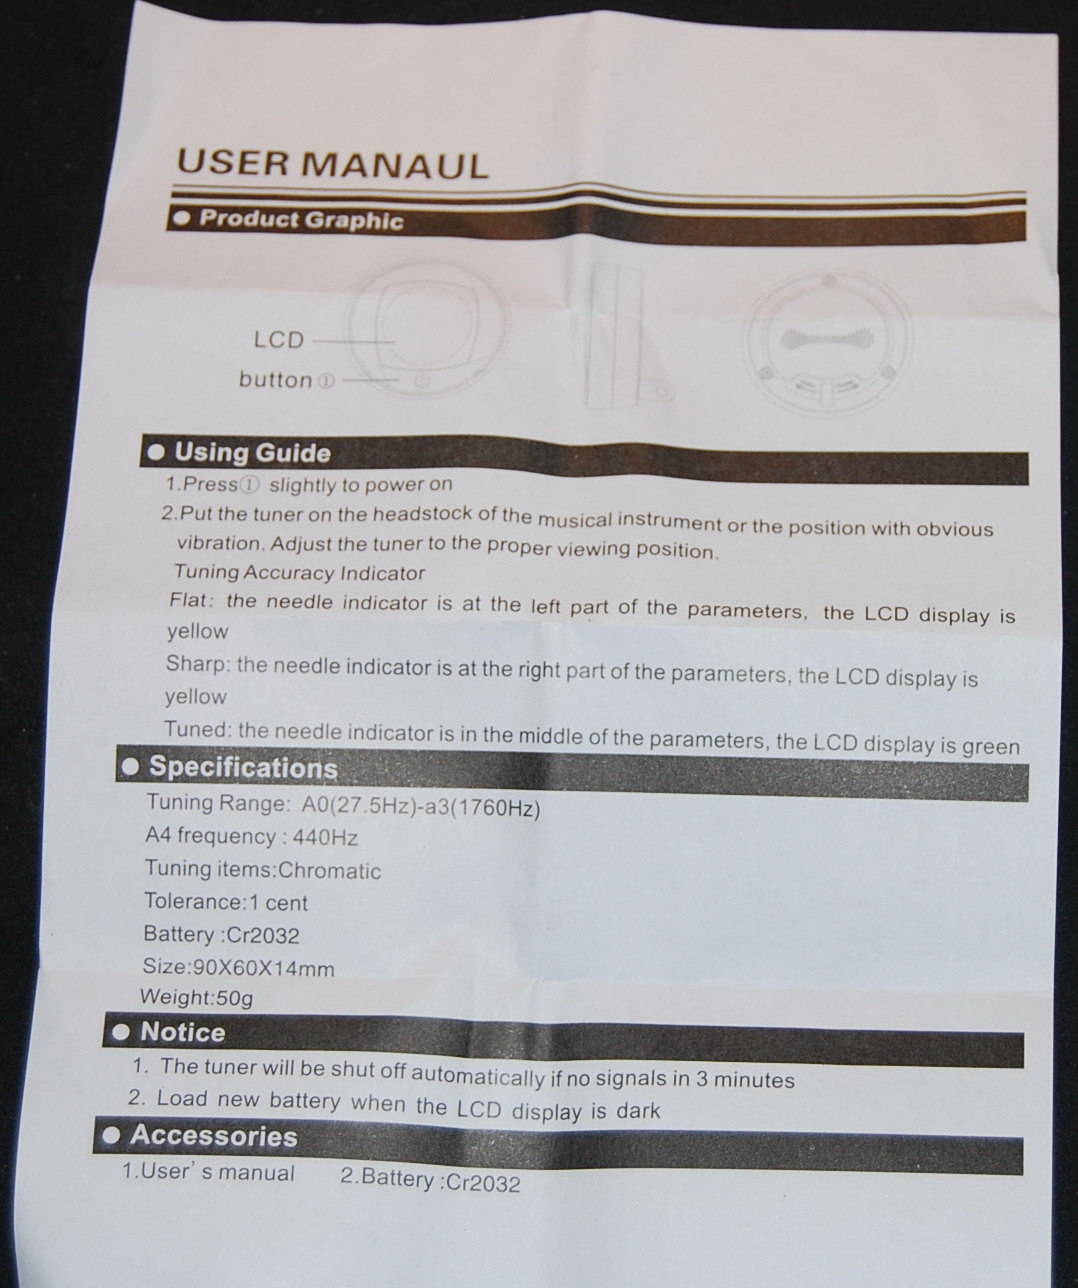
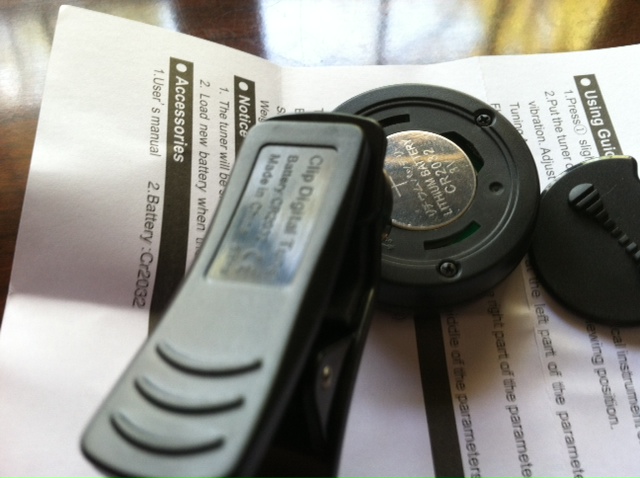
The enclosed instructions included no information on installing the included battery
Battery installation is maddeningly frustrating!
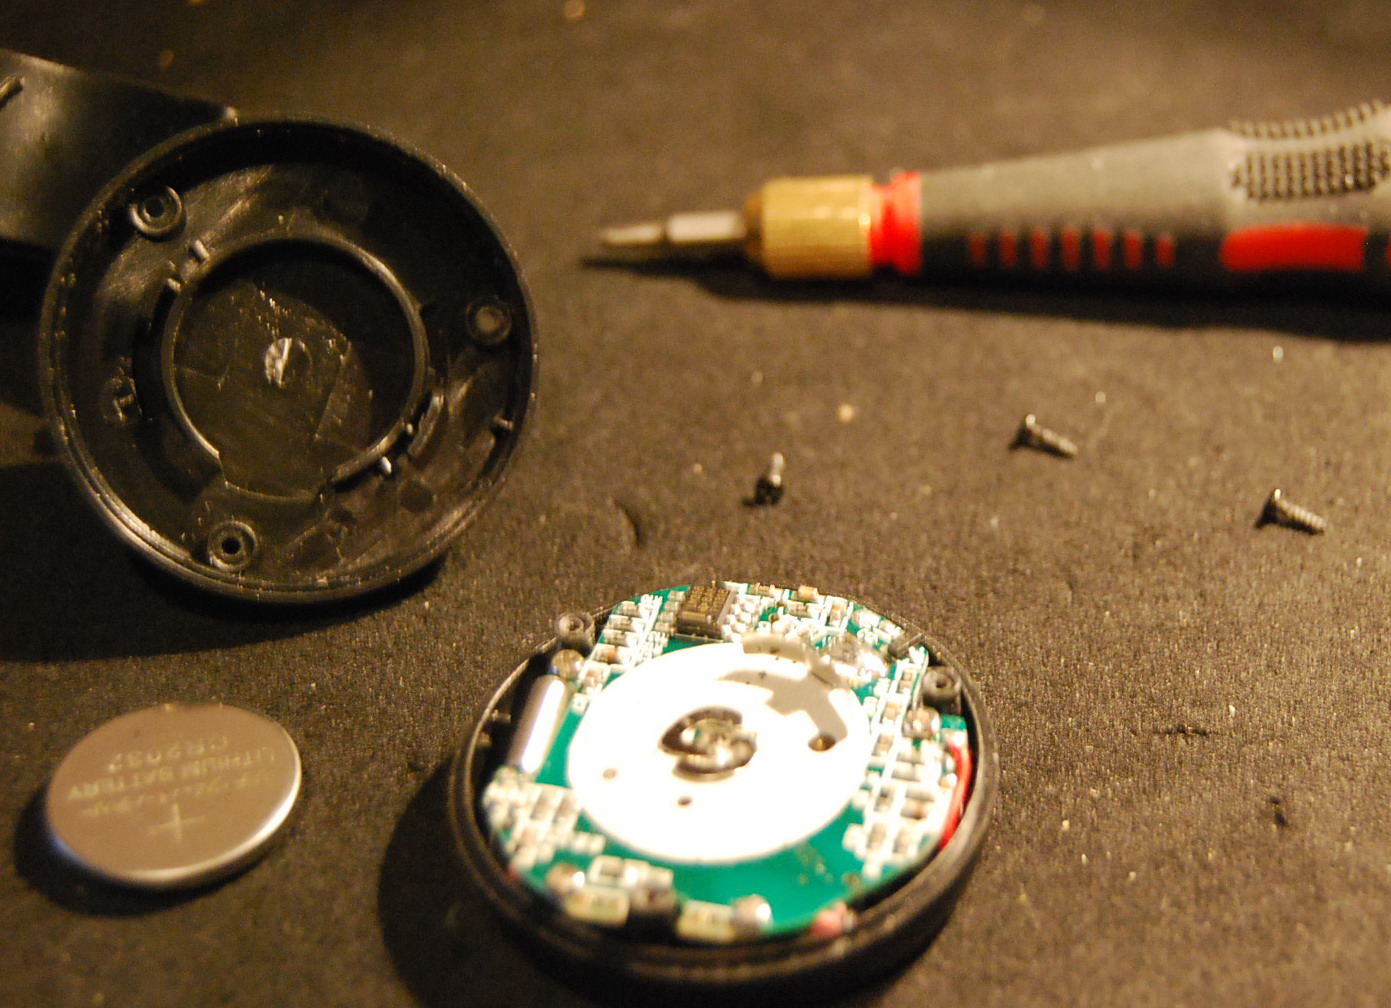
I got out my trusty Philips jewelry screwdriver, unscrewed and popped off the back.Where the battery went became obvious, the polarity orientation was not.
I read the enclosed instructions for the Reverb.com Three Buck Tuner which included no information on installing the included battery. As the back of the case had some raised knurled louvers I tried to slide the back off with my thumb. No such luck. I then tried to turn the cover counter clockwise by grabbing the knurled louvers. Try as I did, still no luck and I feared if i applied any more force, I might break the unit. Then I noticed three tiny screws placed in triangular formation. I got out my trusty Philips jewelry screwdriver, unscrewed and popped off the back. Where the battery went became obvious, the polarity orientation was not. I placed the battery in and nothing happened, turned it over and voila the unit came to life and lit up with a beautiful color display. I consider myself pretty handy at dealing with small stuff, but the battery installation was a bit dicey and quite maddening. As it turned out, you have to get the battery to lean against a raised curved spring bar and then slide the cover on so that it pushes the battery the rest of the way into position and then squeeze to close.
Starting to think that by the time I got it right, I might kill the battery.
This approach took several tries each time powering up the unit. I was starting to think that by the time I got it right, I might kill the battery. Finally or so I thought, I got the battery in and the back on only to find out that my screws were not aligned with the now hidden receptacles. The back comes off again and the battery loses its tenuous position, only to do this all over again this time making sure the screw holes are lined up. Would have been nice if there were markings on the outside of the case to indicate where the screw holes were, but again at this price………
Okay so one more time and it is done!!
“What a piece of junk!!” “good-buy three dollars” was now “good-bye three dollars”???!!
Once powered on (hold the on/off button until the unit powers up, do the same to power off) the unit shuts down by itself in three minutes. I clip the tuner to the headstock of my Epiphone ES339 Pro and I am getting totally erroneous readings. At this point, I am thinking; “What a piece of junk!!” and that my “good-buy three dollars” was now “good-bye three dollars???”!! After taking a pause to say “hmmmmm…”I decided that maybe rebooting this tuner might clear things up now that I knew how to install the battery without a dozen false attempts that might have “confused” its tiny brain. A snap off, install battery, snap on scenario for battery installation would have made a potentially great tuner also a totally legendary experience overall.
Back off the cover comes once again,….. GROANNNNNNnnnnnn.

Liquid Patience puts things into a new perspective!
Liquid Patience……….
I was a half hour into this by 7:30 P:M and was now sensing the need for an adult beverage to take the edge off the growing frustration. A nice cold Miller 64 http://www.miller64.com/ and a shot of vodka http://en.wikipedia.org/wiki/Barton_Brands did the trick by putting things into a new perspective! Liquid patience! I loosen the screws enough to spread the back off so that battery contact is lost and the tuner winks out. I wait about fifteen seconds and squeeze the case closed and with the tuner coming back to life, I once AGAIN!!! Tighten the screws.
Voila, the tuner locks on like a magnet!
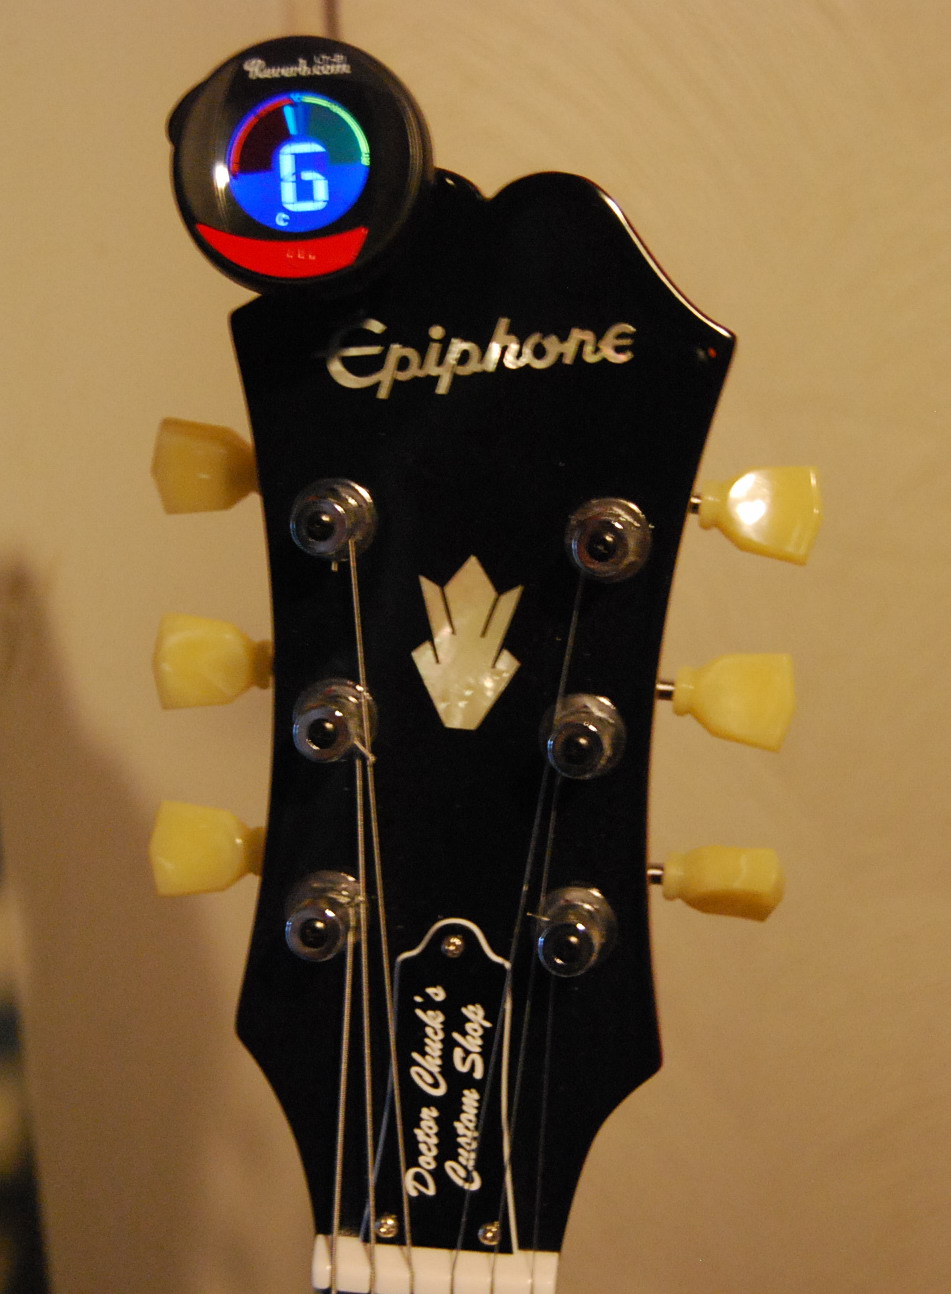
Voila, the tuner locks on like a magnet to each string with its beautiful
color display.

This little Reverb.com
three buck tuner very calmly led me to perfect tuning on every string.
Another pull on the Miller 4 bottle and I attach the Reverb.com three buck guitar tuner yet again to the headstock of my Epiphone ES339. Voila, the tuner locks on like a magnet to each string with its beautiful color display. I guess that rebooting was the thing to do and I am glad I did not give up on it and put it to the curb! Unlike many tuners that maddeningly waver sharp of flat seemingly for no reason, this little Reverb.com three buck tuner A NO BRAINER!! very calmly led me to perfect tuning on every string. In short it works and looks great!!
Includes five modes: C, G, B, V, U (chromatic, guitar, bass, violin, ukulele) to cover the gamut of stringed instruments.
Further info on the display. At the bottom there is a series of letters: C,G,B,V,U that you can access in sequence by quick clicks of the on/off switch. I really could not figure out what purpose it had other than adding confusion to my guitar tuning experience, and there is nothing in the instructions alluding to their function. In any case, if you happen to notice that your tuner is acting whacky and telling you that you are on your “G” string when you are in fact on your “D” string, take a look at the little letter and if it is not the letter “C or G”, click your way to either and restore sanity back to the tuner and to your life. Frustrated I then go back to the original ad to see if I missed anything not included in the instructions. As it turns out I did!! Those little letters NOT explained in the owners manual are indeed explained in the original promotional ad copy which explains that the Reverb.com Three Buck Tuner; A NO BRAINER includes five modes; C,G,B,V,U (chromatic, guitar, bass, violin, ukulele) to cover the gamut of stringed instruments,… duh!!!……
Reverb.com Three Buck Guitar Tuner definitely worth the price of admission.
There is no reason for you NOT to get yourself one!
Now that I have explained how to install the battery, there is no reason for you NOT to get yourself one while the getting is good. At this price and level of performance which is as good as or better than other similar tuners at several times the price, I might guess that they will not last. No excuses! Great little tuner! Period! And now you know why you should get one. The Reverb.com Three Buck Tuner really is three buck Wonder and A NO BRAINER. Order one today!!
https://reverb.com/item/45234-reverb-clip-on-tuner
Just out of curiosity I did a Google search for “$3 guitar tuner” and it seems there is only one to be had!! The Reverb.com Three Buck Guitar Tuner. A NO BRAINER!!!
PROS: Excellent well built tuner with a bright clear color display and unwavering solid string tracking. Amazing, unheard of unbeatable price includes, battery and shipping!!! WOW!!!!!! A must have gear accessory!
CONS: No instructions for battery installation which is maddeningly frustrating until you figure it out and get the knack. Case could have had markings to let you know where the screw holes are which are hidden once you place the battery cover back on. A snap off, install battery, snap on scenario for battery installation would have made a great tuner also a totally legendary experience overall. Instructions should have included information on the tuning modes only explained in the Reverb.com promotional ad copy.
UPDATE!!!!!!!
Two of my buddies got back to me on their experiences with installing a battery on the Reverb.com Three buck tuner. A NO BRAINER!! Buddy number one experienced a bit of difficulty until his son, obviously with better vision pointed out the little symbols his Dad and I had missed….
<<So my tuner arrived the other day and I spent about an hour trying to get the battery in, which I was finally able to do, but not before dropping one of the (tiny) screws on the floor and not being able to find it until I swept the floor the next day. After I put the screw in, I explained to my son how ridiculously difficult it was to put the battery in. He looked at the tuner and said, all you have to do is screw off the back. OMG! Look at the back and, where the tuner mounts to the clip, on the left it says “OPEN” with an arrow pointing clockwise, and to the left it says “CLOSE” with a CCW arrow. It’s VERY difficult to see, but it’s there, and the back does indeed come off when you turn it CW. Check it out.
Buddy number two also pointed out the desired way to install the battery while also being so “kind” as to praise my blog and to suggest a topic for my next post. (Grooaaaannn…..)
I guess there were no battery loading instructions because it’s blatantly obvious how the compartment opens. So much for the value of your blog. I guess anyone with enough time on their hands to endure reading your blog can well afford to follow your instructions. Your next post should educate your readers (on) how to open their guitar cases by removing the hinges!… >>
Reverb.com Three Buck Tuner. A NO BRAINER! Back cover unscrewed off.
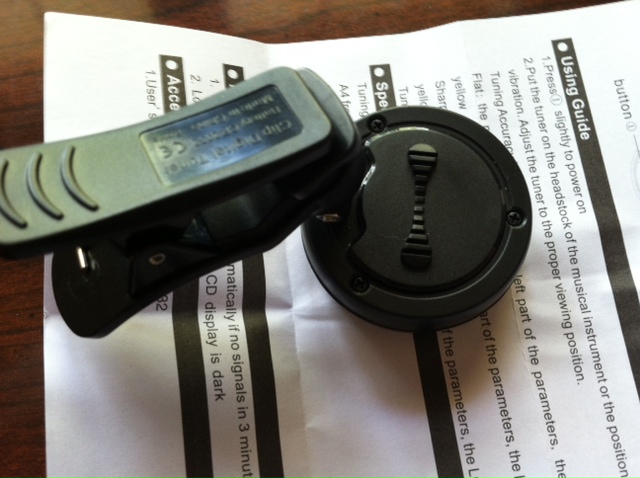
Reverb.com Three buck tuner. A no brainer!!! Back cover replaced.
Liquid Patience puts things into a new perspective!
So as can be seen, I get by with a little help from my friends…….In any case, despite failing at first to notice the tiny “open” and “close” designations, I did indeed at first try the intuitive method of unscrewing the knurled back to open it up. Would not budge with what I thought was a very ample amount of force, and for that matter still will not as I tried again with most ample force. I suspect buddy number two’s Reverb.com Three Buck Tuner unscrewed quite a bit easier otherwise he might have unscrewed it like buddy I and buddy number one did. For three dollars I may throw caution to the wind and try once more, maybe with a channel lock pliers and see what happens. Hahaha!!… Hmm… maybe not…………. In any case, despite the inadequate instructions, this Reverb.com 3 Buck tuner is a great deal and a NO BRAINER! Get one while the getting is good!!
The Plot Thickens……..That the back of this tuner was counter conventional never occurred to me, duh!
Good thing I did not take myself seriously with that there channel lock pliers and forcefully try to unscrew this darn thing. Sometimes childish ignorance is bliss and an advantage. Turn one way, then turn the other until it opens is a naïve but obviously very effective approach. From countless hours tinkering with nuts and bolts and anything that requires using screw drivers I am programmed towards convention almost to a fault ( righty tighty, lefty loosey) That the back of this tuner was counter conventional never occurred to me where as a child, with no preconceived notions might find the solution in a child like manner that I failed to see. The few things that I have encountered with reverse threading also had instructions that pointed this out. I never expected this in a guitar tuner as there is no advantage in doing this. So in the end I love the tuner but the owner’s manual leaves a bit to be desired. No instructions on battery installation and tuning modes and the fine print on the tuner itself was extra fine. The main thing is that this Reverb.com Three Buck Tuner is a great tuner at a great price. No regrets!
Sounds like a Hot Tuner.
Let us know how it holds up, e.g., how long the battery lasts.
Thanks Chuck for such a wonderful glowing review!!
After giving my Fender (mini) Bassman a tune-up, I decided to tackle this bad boy while I had out my jewelers screwdriver.
1) The battery polarity became obvious to a techie like me,
the Circular ‘holder’ is also a contact, and the little
springy tabs in the center of the circular area HAVE to be
the other contacts, so, simply insert the battery right side up, so you can read the writing on the battery.
2) Before dis-assembly, I did a slight scratching on the 12 o’clock high screw position before I took it apart, so I was able to change the battery, align the screw holes, and get this little sucker
all put back together and fired up in less than 3 minutes!!
Once again, great review, and great site!!
One quick note:
It says in the instructions that the unit will self
shutoff in 3 minutes. However, you can turn it off
by pressing the button and holding for a full second.
This will save the battery, and allow more many more
uses.
How high were you? Do uou pull a motor to get at the spark plugs? Take the hinges off a door vs. using the knob? Wow……
Hahaha!!! LOL! I wasn’t high at all. It was jammed at first and would not turn with reasonable force. I got a second one and it opened up much easier.
You don’t need to unscrew the back. Gently turn the knobby handle clockwise & place the battery + side up.
Hey Guys! I appreciate all the comments. You may want to check the post again. I updated it to reflect the feedback.
Thanks again.
C
Twist the battery compartment cover to the left to open
Thanks. I finally got to your post after reading them all.Just twisted the back, cover came off, inserted battery, twisted cover again. No need of removing screws.
Yes, thanks. So I found out. Relieved that I was wrong and there is an easier way!
That is what I originally did and as it did not budge, I was inspired (wrongly as it turned out) to write this post. Thanks for your input.
Thanks. Great tuner!
Thanks!!! After reading your instructions, I had no trouble installing the battery! Great job!
Finally someone approves on my post inspired by my blunder! THANK YOU!
I Think it would be a good idea to either put the solution at the top of the blog or a disclaimer to read the entire blog before giving up …
Good point. Thanks.
Buy Right, Buy once.
I got a few of these to give to friends & kids learning the guitar. I suspended my suspicion that they would be junk, as I like Reverb.com & thought they might be sourced from the factory that makes Snark tuners.
Unfortunately, I was wrong. The battery compartment’s “L” shaped latches are incredibly fragile: 9/10 tuners are already broken. My .058 string is thicker than those latches, , and the plastic is PETE, which tends to be malleable with low wear resistance.
I realize it’s hard to criticize a such an inexpensive product, but examine it logically: are you willing to waste $4, when a better product is available for $9?
Even at $4, it’s not bargain. I’m certain a battery drawer, or proper threading would add to the cost of the unit, but if you intend to own it long enough to open the battery compartment, the extra cost would be worth it.
Alternatively, they could even save manufacturing costs by eliminating the door altogether & ship with battery installed. It would be an environmental mess, but selling it as disposable would be more realistic.
(Note: To salvage the broken tuner, you can super glue the back door in place, and unscrew the housing when it’s time to switch batteries; just have a magnet bowel handy.)
I like Reverb.com, and I’m glad they’re sourcing affordable essentials, (the Straps are great, cables pretty decent,) but unfortunately this tuner is only useful as a short-term novelty.
Alternatives:
You can currently buy a Snark for about $8.50, or the D’addario NS Micro for $11. The Snark & the $4 Reverb unit are multi-colored, and better for people who want maximum clarity. The NS Micro is far better suited to “set & forget”, as it’s so small as to be nearly integral to the headstock.
Both the Snark & the D’addario have vastly better battery access; a drawer system. The drawers, while not captured, are far stronger than the rotary latch on the Reverb unit.
In Short: spend the extra $5-7, save your time & avoid frustration.
Buy once, cry once.
Gabriel, Thank you for such and in depth analysis of the tuner. I am sure this will be very helpful for those who have one or who would like to get one. Chuck