Posts Tagged ‘Epiphone Custom Shop EB3 bass’
In my continued search through a plethora of guitar parts on the market I will need to address the next issue on this new Epiphone Custom Shop EB3 bass, (or as I search for bass bridge parts I might refer to this as the Epiphone SG bass) and that is intonation. So now we are getting in to the set up phase of making this bass rock! First, I lowered the bridge to the point where they cleared the upper frets without choking and fretting out and also still rang clearly. Now in the lower fret area I saw that there was more “relief” or upper curvature that I like and felt there was room there to get the strings a bit closer to the fingerboard. Off comes the truss rod cover, insert the truss rod wrench and very slightly turn clockwise checking between increments. As the truss rod is adjusted in this fashion, the relief is lessened, the neck becomes flatter and the strings get closer to the fingerboard resulting in lower more comfortable action. What I want is to get the playing action as close and effortless as possible while also allowing the strings to ring out clearly. When the strings are high they ring out clearly. When they are too low they become stifled and somewhat dead in sound, and also quite often buzz. My goal is to reach that particular “sweet spot” in between these polar opposites that gives me the best of both worlds; comfortable playing action and great tone.
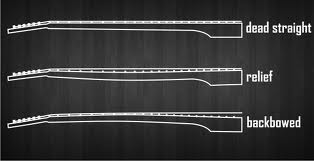
Trying to get to get the bass strings as close as possible while still allowing them to ring out requires minimizing relief but avoiding back bow on the Epiphoine EB3 or Epiphone SG bass.
After a few tweaks of the truss rod of about an eighth of an inch each time, I get there. Doing a test run, it plays really good, but after tightening the truss rod, I have a little buzzing on frets 19 and 21. Feeling that they may need to be filed and dressed, I resist the urge and let the bass sit for two days after the neck adjustments. This is a good idea because we are dealing with wood. By tightening the truss rod, I increased the tension and stress on the neck. Quite often after getting things really nice, you can come back a day or two after to find out that the neck responded more than you might have anticipated leaving you with less than ideal relief, in which case you have to go back in and readjust in the other direction to lessen the tension and bring the neck back to where you wanted it.
Sometimes you have to repeat the process, sometimes not. Like I said it is wood and that leaves a percentage of uncertainty with respect to truss rod adjustments.
As it turned out, there was no change at all after a couple of days. Out came the fret files. This can get tricky as you will see. I stated that frets 19 and 21 were buzzing just a bit. First I cleared fret 19 by slightly taking down fret 20. Good so far, well not exactly because fret 20 was now buzzing against 21 where it wasn’t previously. Now I take down fret 21 and all seems pretty good except for just the slightest buzz of fret 21 against fret 22. A slight filing of 22 corrects this. Then I get my fret dressing and polishing kit out to smooth down the areas where I adjusted and leave a mirror like surface once again. Nice action, clear bell like tones. Cool. Apply a thin coat of lemon oil to the fingerboard, work it in, buff it out.
The lesson to be had from this is that when you eliminate a buzz somewhere on the fingerboard, often afterward, you start to chase that buzz all the up the fingerboard. In this case when fret 19 buzzed against fret 20, I ended up filing all the way up to the last fret to get it right. So you have to be careful, VERY careful not to overdo it, especially if you have a problem much lower down the neck. You have to be very patient and make very slight adjustments when filing a fret, constantly checking and rechecking. You can easily take away height but if you’ve gone too far, you have a potential nightmare on your hands. So if you are ever inclined to do this to a guitar, grab yourself a cold Miller 64, sit back for a few minutes and enjoy, then really consider whether you are up to the job. If you have never done any fret work or set up work you might want to consider acquiring a nice cheap guitar on Ebay and hone your skills a bit before you go out and start messing with one of your keepers, or let an experienced tech do the job for you. I have been doing this for a long time and I still have some dicey moments that I start to cut a sweat over. So far, knock on guitar neck, no disasters.
Next intonation check. Everything is within normal limits and sounds good except for the G string. The 12th fret octave is noticeably sharp of the harmonic. What to do? In order to bring the octave down you have to increase the overall string length between the bridge and the nut. I then adjust the bridge saddle so that it is further away from the nut. I do this until the 12th fret octave rings true with the harmonic. Now there is another problem. As it turns out, the more the saddle is adjusted away from the nut, the closer the string becomes to the neck. With the intonation adjusted properly, the G string is too close to the neck and fretting out. It should be a simple fix, right? Simply raise that saddle until the string height falls inline again with the other strings. Problem is, Epiphone and well as the Gibson EB3 have only a two way adjustable bridge. You can adjust the entire bridge in terms of height and the bridge saddles individually in terms of intonation but you cannot adjust the individual saddles for string height. This really sucks, especially when I am now so close to reaching “set up Nirvana”.
What can be done. I can adjust the bridge as a unit to where the offending G string sits properly which would make the other strings unacceptably high, and then file down the remaining saddles until they all line up with this SOB of a G string! Extremely labor intensive to incrementally file a steel bridge saddle until it matches and then do it two more times while making sure that the intonated spot on the saddle adjustment screw is not altered. I think I’d rather experience Chinese water torture than go through that. So throwing my hands up in the air I came up with a quick effective but very cheesy fix. I took out a fat rubber band from my junk drawer that was used previously to hold a lobsters claw closed. I am sure you know the type. Small diameter, wide, and thick. I cut two vertical slices from the rubber band and place one under the G string saddle to raise it. Not bad, but not enough. Add the second slice and that does it. I have raised the saddle with two chunks of rubber. Not very elegant and I am not really happy about this but is effective for the time being and does the job.
In the meantime I sort through as many guitar blogs and guitar parts blogs and websites for Epiphone Bass Parts as I can find relative to this problem. Honestly, I think this is a design flaw and both the Gibson and Epiphone bridge are pretty much the same. In fact, the original Gibson EB3 bass didn’t even have intonatable bridge saddles but simply a raised berm on the bridge to approximate where everything might be correct. 2 way adjustable is bad enough. That must have stunk even worse considering the the only adjustment possible was to raise or lower the bridge height only as a unit!

Gibson EB3 Original One Way Adjustable Bridge Not very adjustable at all! One size fits all intonation!
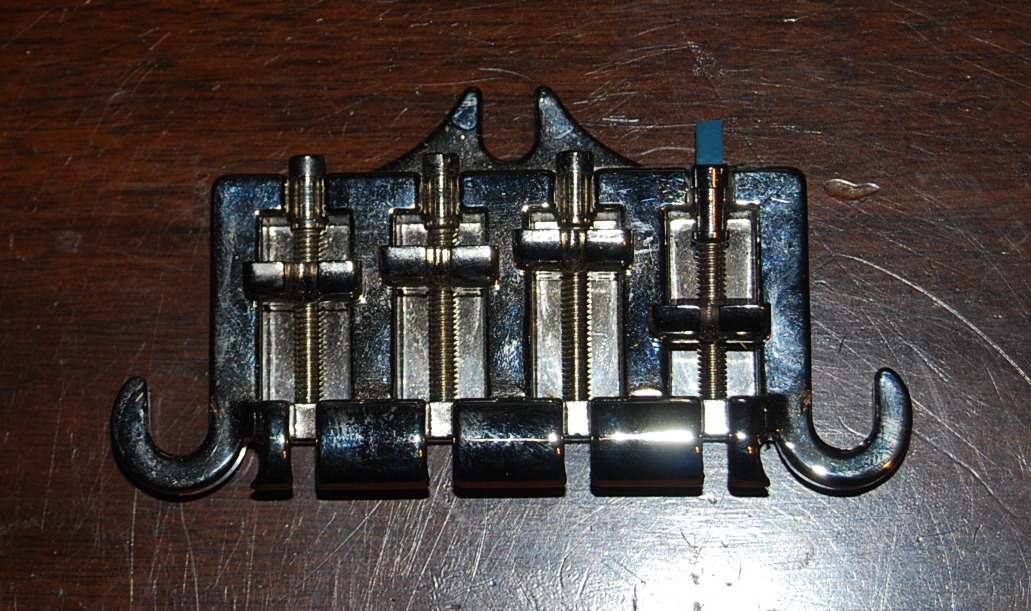
Epiphone stock 2 way adjustable bass bridge. Note lobster claw rubber band segments for G string height adjustment. Yipes!
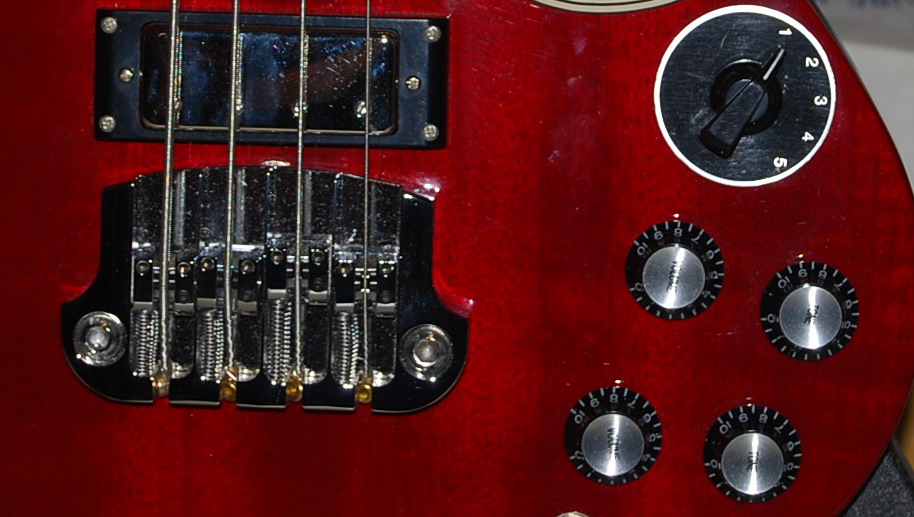
Epiphone EB3 bass with 3 way adjustable solid steel HIPSHOT SUPERTUNE bridge ROCKS!!
Oh well, that’s life I suppose… Then I happen to come across what might very well be the solution!!! Noodling around Ebay I see something that is the answer and the second easy mod that will make this bass ROCK! It is called the HIPSHOT Supertune Bass Bridge. For further information click on this link:http://store.hipshotproducts.com/cart.php?m=product_detail&p=264
This is a direct no modification replacement 3 way adjustable bridge for Gibson and Epiphone EB3 basses. Looks like EXACTLY what I want!. Ch-ching! Add another $89.00 to the cost of admission but if this mod, like the Rothstein varitone circuit can make a significant improvement on an overall excellent platform it will be worth the investment and so I do a BIN ( Buy It Now ).
The following week the bridge arrives and the install goes smooth as silk taking me seriously about five minutes for the basic install. I tune up to pitch and do a quick adjustment of individual string heights!! Yay!! INDIVIDUAL adjustment!!! The bridge saddles are similar to what you would find on a typical Fender Sratocaster or Telecaster having twp set screws for height adjustment; one at either end of the saddle. Then I adjust all the 12th fret octaves to ring true to their respective harmonics and do a final height adjustment
on all the strings. Wonderful, this bridge totally works, is a beautiful addition, and is built like a tank. Final tune up, plug into my Ampeg B-15R and this bass plays and sounds spectacular. This new chunk of steel bridge really seems to improve the depth and sustain as well and it does make sense. Instead of the old bridge suspended over the top of the bass by three bolts, this bridge is clamped flat against the top by two bolts. The entire bridge assembly rests right on the bass. This Epiphone EB3 bass plays so well now, I really cannot see how one with a Gibson name on the headstock could outdo it!!
Next up; 3 easy mods to make your Epiphone EB3 Bass GREAT! The Finishing touch!
Part One: Tone Launch though “varitone”…
Okay, here we go. Next up on 3 easy mods, we’re plugging the new Epiphone EB3 Bass in to my Ampeg B15R (awesome vintage inspired bass amp!) Volume up, tone up. What no varitone? NO VARITONE circuit?!! What?!! ARE YOU %*&$*%#!!! KIDDING ME?!!! And so I discovered that what looked like a varitone was not one at all. Such dastardly wretched duplicity!!! Such deceitfulness!!! A simple chicken head knob with three positions: neck pick up, neck and bridge pickup, bridge pickup. Basically this is the same circuit as on your garden variety toggle switched Les Paul, dressed up to look like a varitone!!!
What?! No Varitone?!!!
You kiddin’ me?!!
What a bummer, what a misconception! I felt like I was misled at first, but in reality this basic three piece circuit was staring me in the face. On close inspection of the control plate underneath said chicken head knob were the numbers 1,2,3. That’s it. Right out there in the open, NOT hiding! I just never expected to see them and so I didn’t,.. obviously. All I saw was the preconceived 4 position varitone circuit in my mind and displaced it on to this bass until suddenly the dawn of reality rushed in. Don’t get me wrong, the bass sounded pretty darn good as it was, but to me, it wasn’t an EB3 without a varitone circuit , dig?
So what to do? And so I searched the net for any Gibson EB3 varitone circuit equipped wiring harnesses figuring that there must be some floating around as presented by the host of scavengers who in their vulture like fashion dismantle perfectly good instruments to part them out and sell the guitar parts for a tidy piece by piece profit. Nothing… Ebay had nothing. Nobody had anything except once in a while a choke which is a part of the circuit, would show up. A lot of good a choke is going to do for me, a person who is not about to construct a wiring harness from scratch even though there are schematic diagrams for this control set up available on the net for this purpose.
I kept putting in searches for the circuit varying the theme here and there to see if I could get a different result somehow. Then I came across a very interesting site called Rothstein Guitars: http://www.guitar-mod.com/# They claim that the “cornerstone of their business is their highly regarded prewired assemblies”. I searched through the site but could find nothing that would meet my needs and so I decided to shoot off an email to Andy at Rothstein Guitars to see if they could help me out.
Hi Andy,
I recently bought an Epiphone Custom Shop EB3 bass. I did not realize until I got it that what looks like a varitone is not. The rotary switch is 3 position only and is really simply a rotary pick up selector. Not that this is inherently a bad thing and it does work as expected, but I was hoping that this bass had the four position varitone circuit which it does not. I guess this was done simply to mimic the look while keeping costs down.
Anyway, I came across your site and was hoping for an “Ahaaaa!!” moment but did not find what I was looking for. By any chance would you make a pre wired Gibson EB3 varitone circuit assembly that I could install in this bass or know where I might find such an assembly?
Thank you very much.
Very Sincerely,
Chuck
With my last ditch effort to upgrade this bass to the way it is supposed to be I patiently waited for a response………….. A few days later I checked my email inbox and there it is! An email from Andy at Rothstein guitars!!!
Chuck –
We have had quite a few people ask us for wiring harnesses for EB-3 so we have been planning on offering some mods. We manufacture our own varitone (Platinum Lab Varitone) that is 6 positions (5 filters and a true bypass). http://www.guitar-mod.com/Merchant2/merchant.mvc?Screen=PROD&Product_Code=V6B&Category_Code=MID We could certainly wire up a harness that has 2 independent volume and tone pots, as well as a master varitone. There would of course be no method of pickup selection, except by lowering the volume of which ever pickup you want to shut off.
Regards,
Andy
I got back to Andy to let him know that I liked what he had to say and wanted to proceed with designing this.
Hi Andy,
That sounds great! And as far as your statement; (There would of course be no method of pickup selection, except by lowering the volume of which ever pickup you want to shut off ) that wouldn’t be a problem as my ’62 reissue Fender jazz bass has the same situation and it never bothered me. I do like the fact that it would be wired and ready and that it is inherently superior with 5 selections and true bypass. If you could get back to me with regards to pricing and shipping I would greatly appreciated it.
Thanks,
Chuck
Bingo!!! And so Andy and I went back and forth a bit on the design layout for this circuit until we decided what worked best. In the meantime a seller on Ebay that I inquired to about the same thing finally got back to me telling me that he could faithfully replicate the 4 position varitone circuit as was used on the Gibson EB3 but by this time I was totally stoked with the Rothstein 6 position design which I thought was a far superior approach and so I stuck with it. I know what you are thinking; “He’s deviating from the original design!!” Look, this bass will never really be a replication of the Gibson EB3 anyway as it says Epiphone on the headstock, yes? Not that I have a problem with that as previously discussed in my last post; Gibson EB3 Bass. “CREAM” of the crop. Why you need one! Even the Epiphone Elite which is as close to original as you can get will, like this one, only be technically considered a “tribute” instrument. Okay, so who really cares about this semantic game? As it is so poignantly said at times like this; “it is what it is”; let us move on……

Rothstein 6 position varitone layout
I sent Andy the pre requisite $150.00 plus shipping and then anxiously waited for delivery of my new 6 position varitone circuit equipped wiring harness.
Okay! A few weeks later it finally arrives!! I open the package and there it is totally laid out and labeled on a piece of cardboard ready for drop in installation. I guess this is the equivalent of a heart transplant for an electric bass and it is time to get the patient prepped for surgery.
First thing is to lie it on my rubber guitar mat face up. I remove the knobs and the all mounting hardware from the existing wiring harness. Next flip the bass, open and remove the control panel cover, de solder the pickup connections, ground wire, and make a note of what goes where for future reference. Okay, next is to lift out the wiring harness leaving a stark bare control cavity awaiting its new heart.
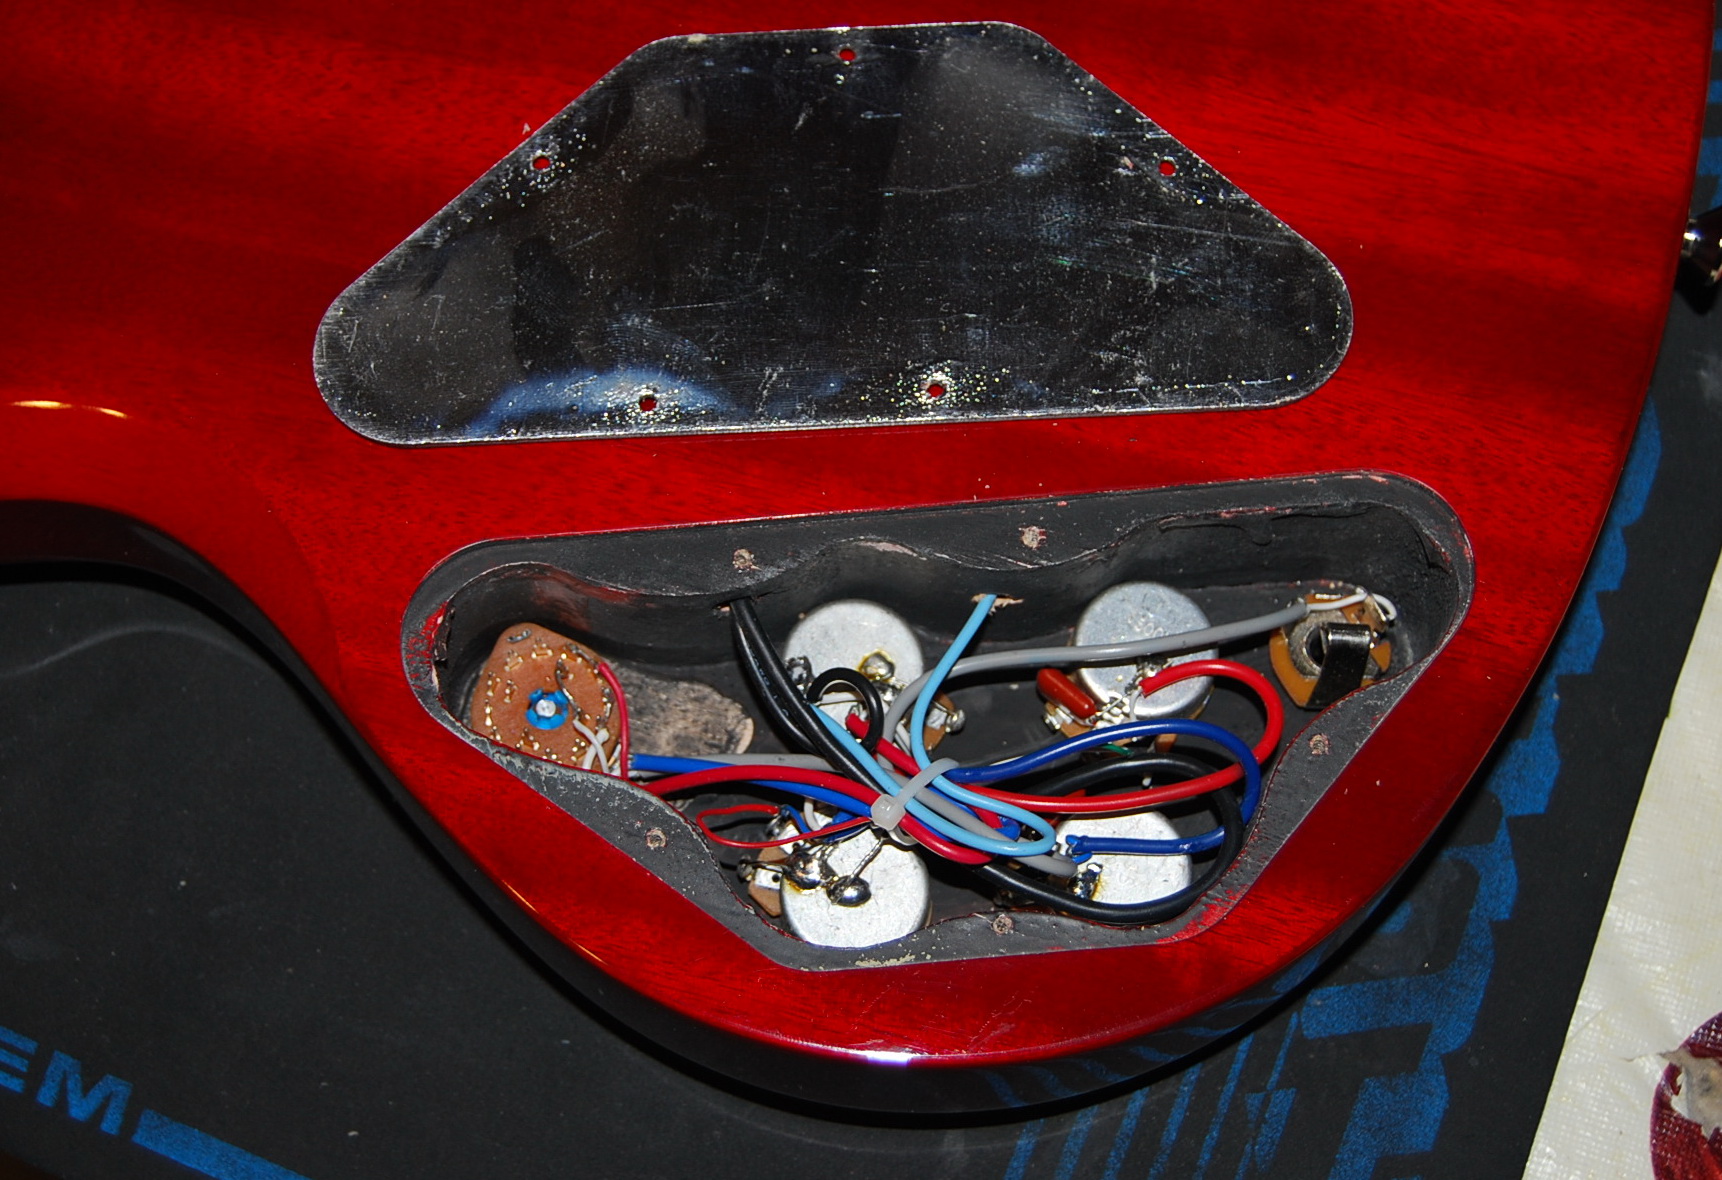
Epiphone EB3 stock electronics

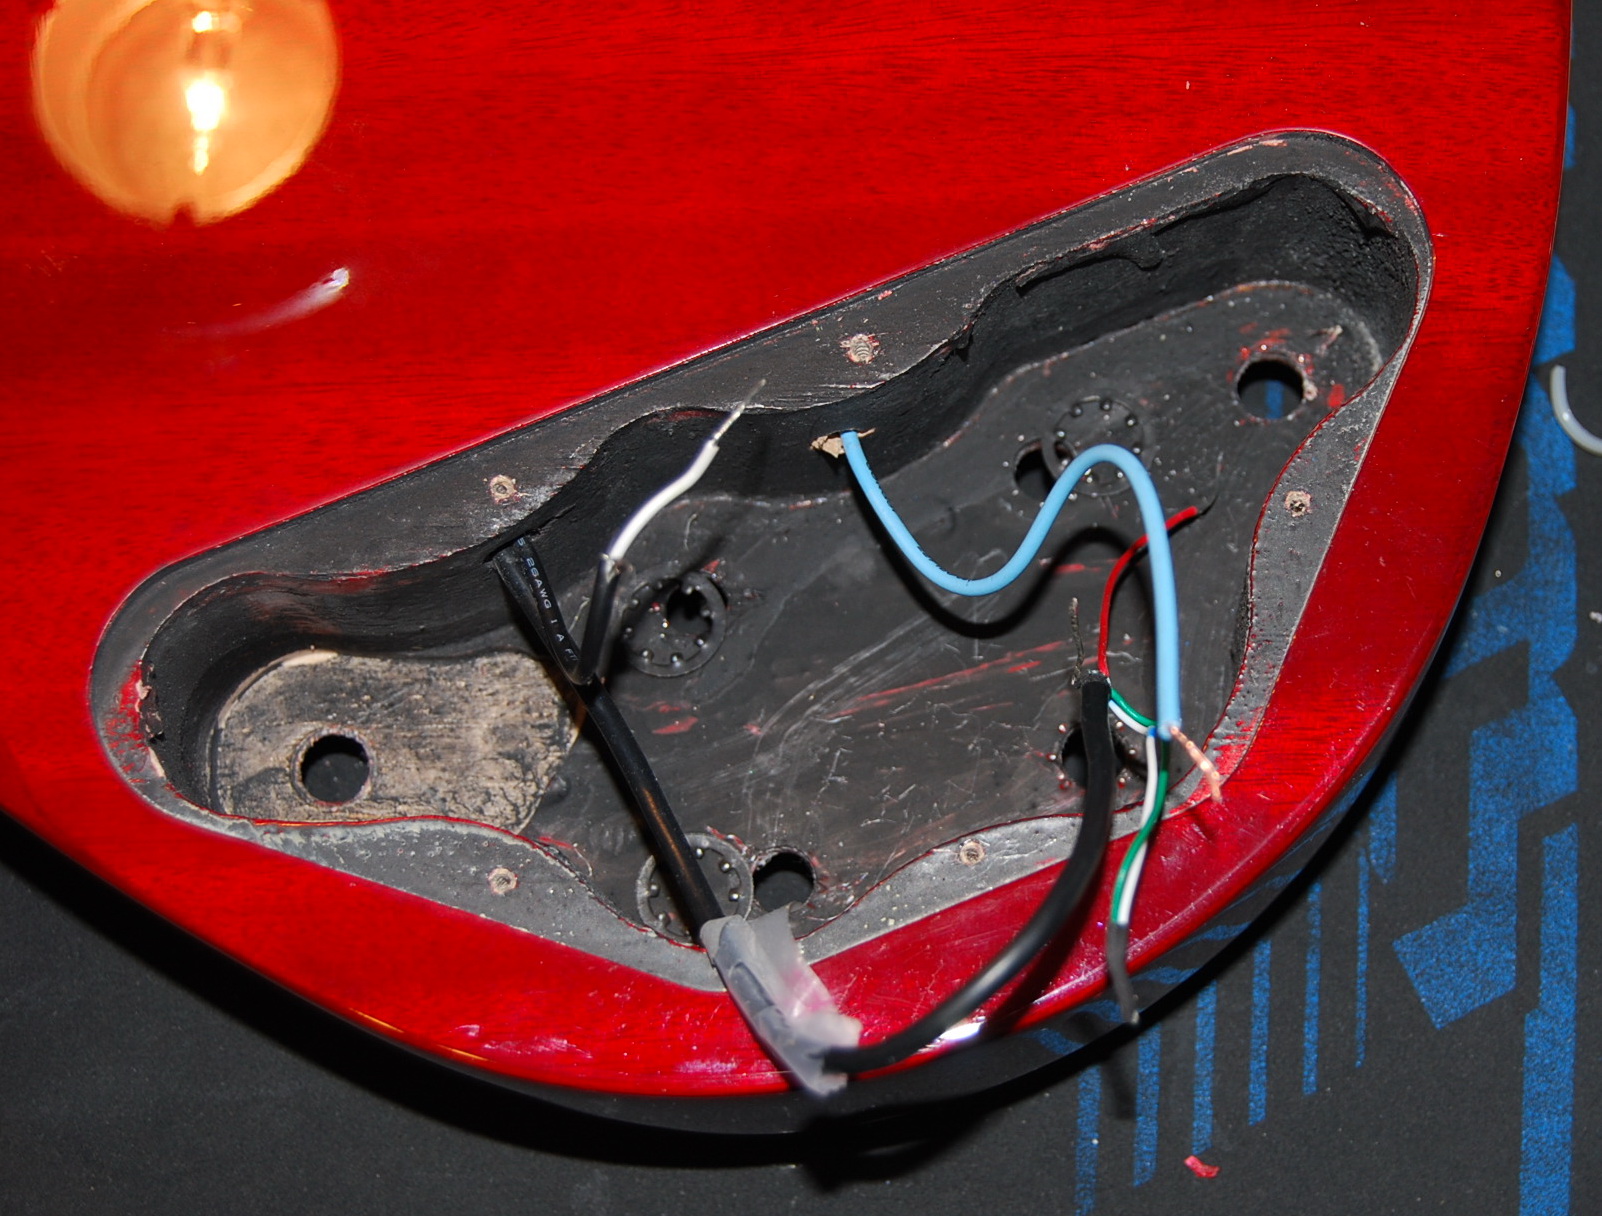
Epiphone EB3 prepped for “heart transplant”
Epiphone EB3 Empty Contol (chest) Cavity “out with the old”..
You know how they say that things don’t always go as expected? Well, one thing I didn’t anticipate was that the potentiometerswould be so heavy duty and therefore with a larger girth on the Rothstein harness that they would not fit through the existing holes. Time to get the drill out! Talk about heart transplant! Now this is getting as serious as a heart attack to me!
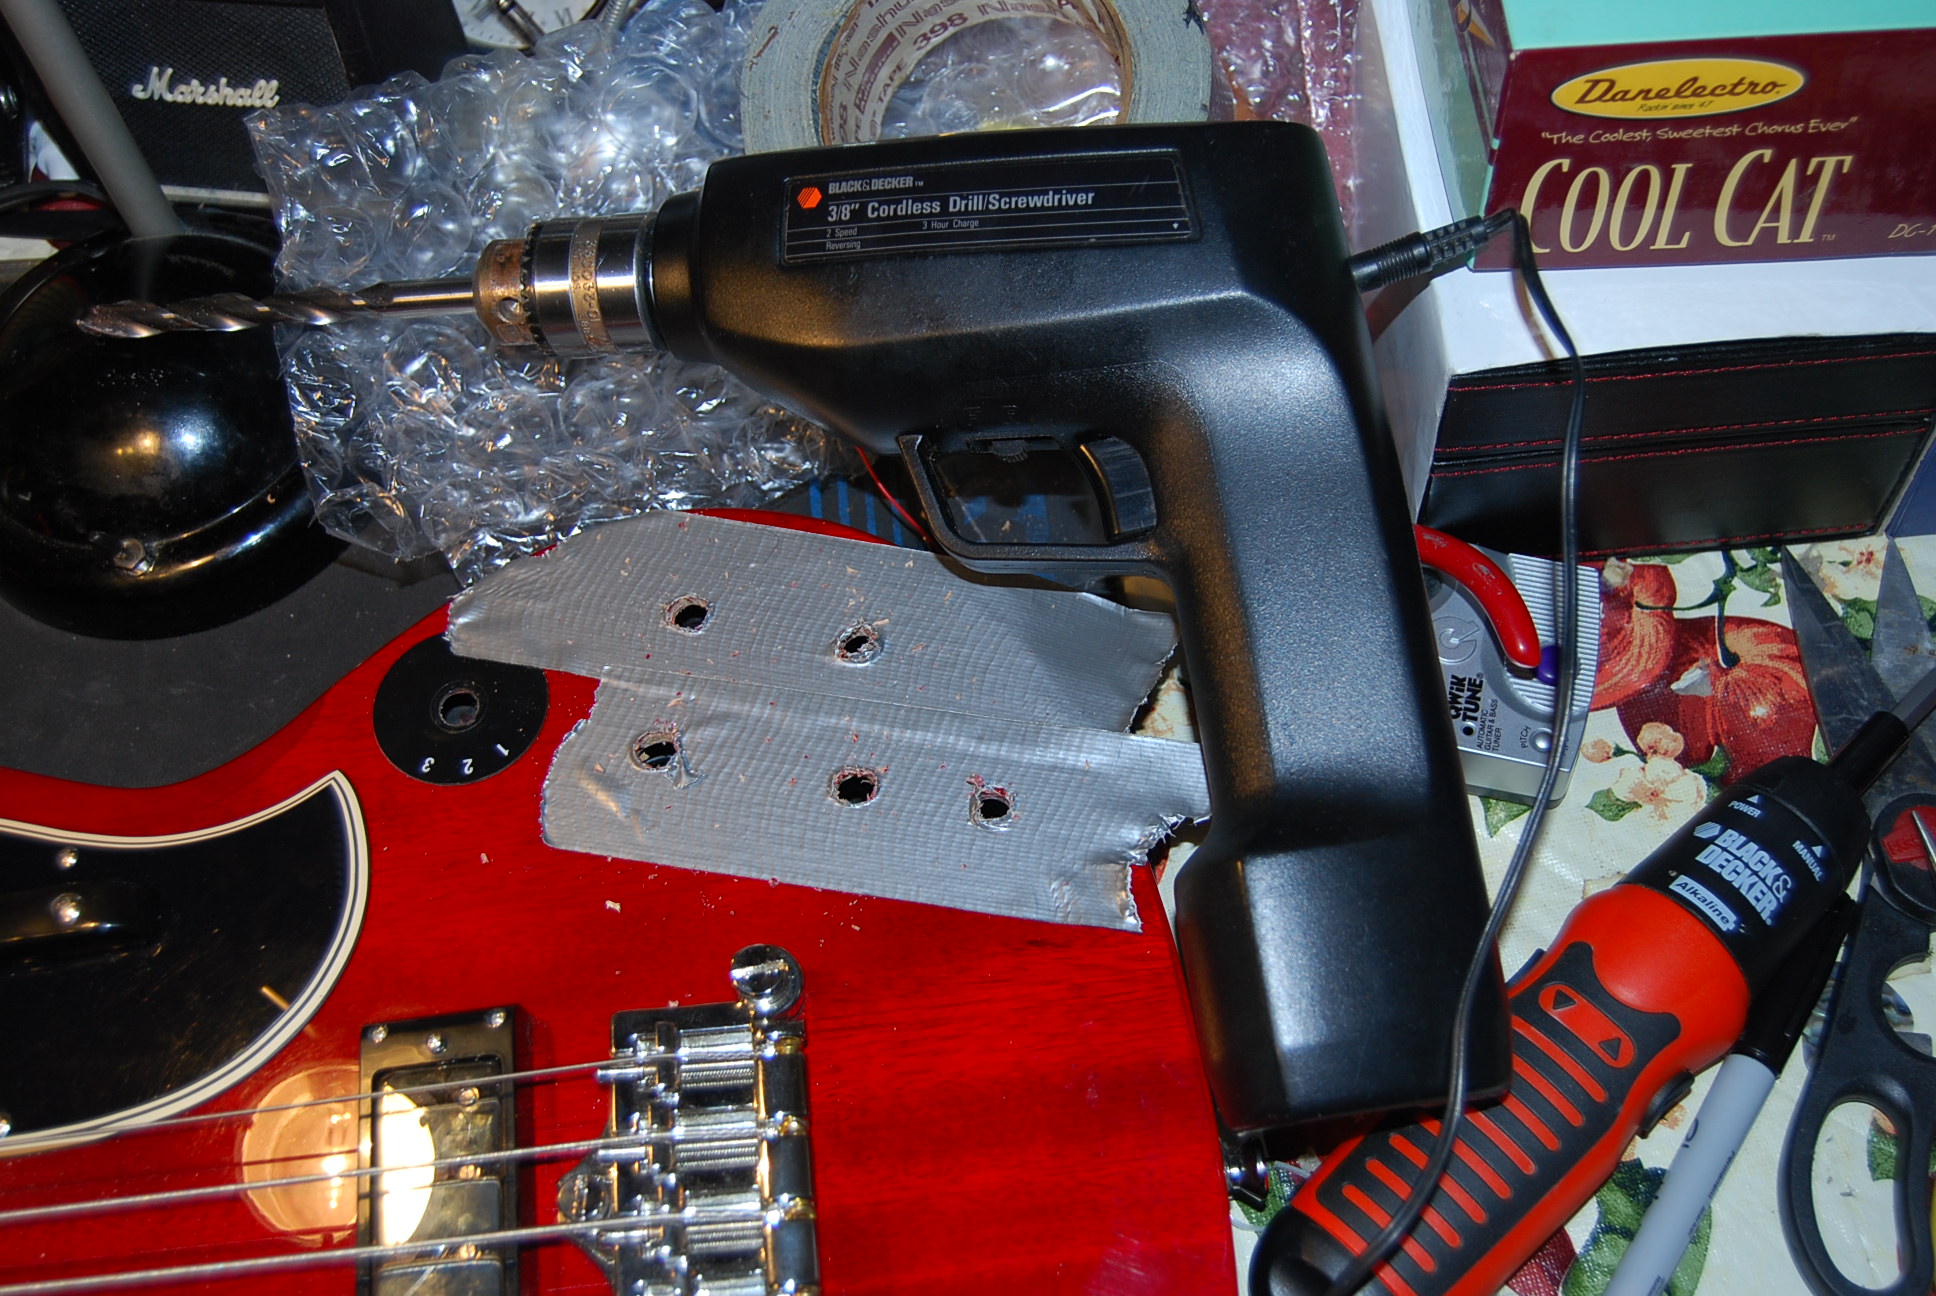
OMG!! That ain’t no Dental drill!!!
The wood in this area is so thin that it could easily split and shatter should the drill bit “grab” the wood. Looking back, I think I could have slowly and methodically filed the holes to a larger size, but at that time in my excitement and rush to get the install done, it never dawned on me to employ this safer approach. What I did do for precaution was to tape off the areas to at least give the wood some reinforcement. Okay, I sized up the drill bit to match the potentiometer took, a deep breath, and drilled out four holes. Exhale!!! …..Went smooth as silk. Whew!! Luckily the varitone switch and output jack fit with no alteration.
Next, I dropped in the new “heart”. Just made it!! If those potentiometers were any wider I would have had to enlarge the control cavity. It was that close. I then reattached the pickups and the ground wire.
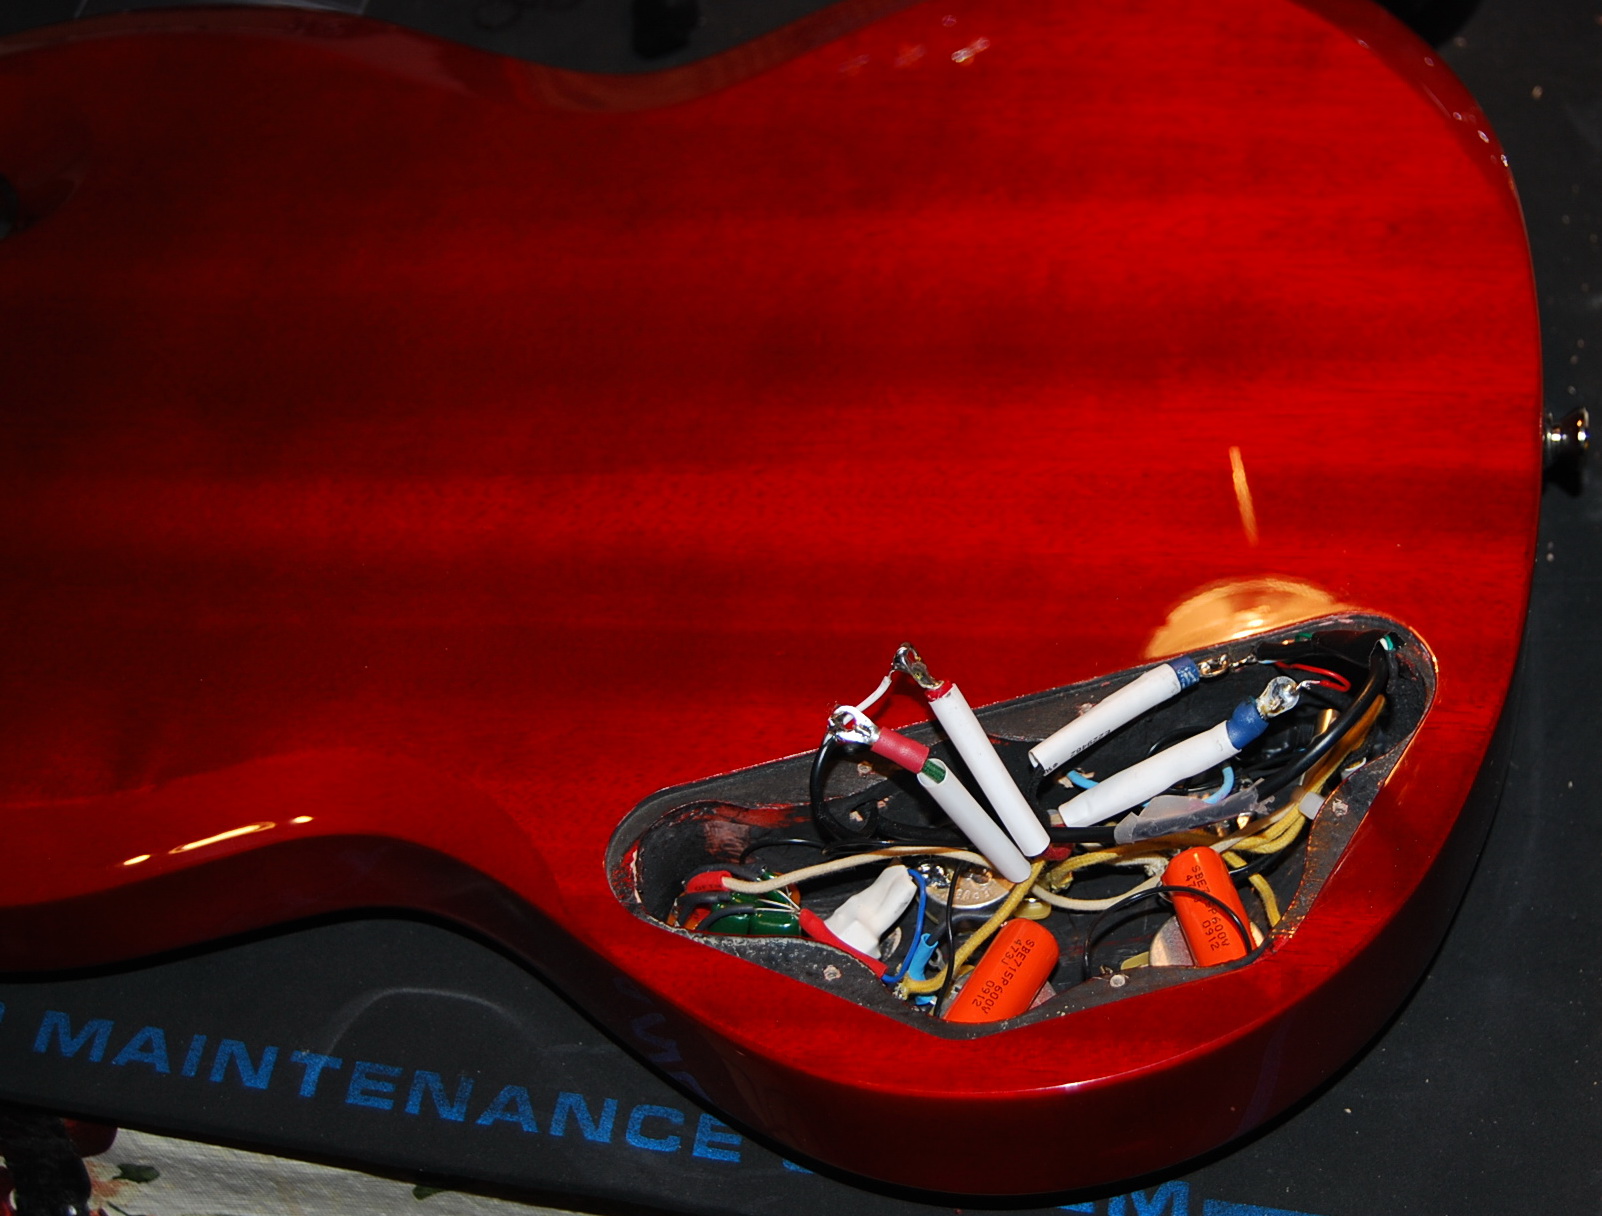
Wiring the pickups (lungs) into the circuit (heart).
I had to sort of press and fit the wiring as the control cavity was now pretty much filled to the max with wiring “business”.
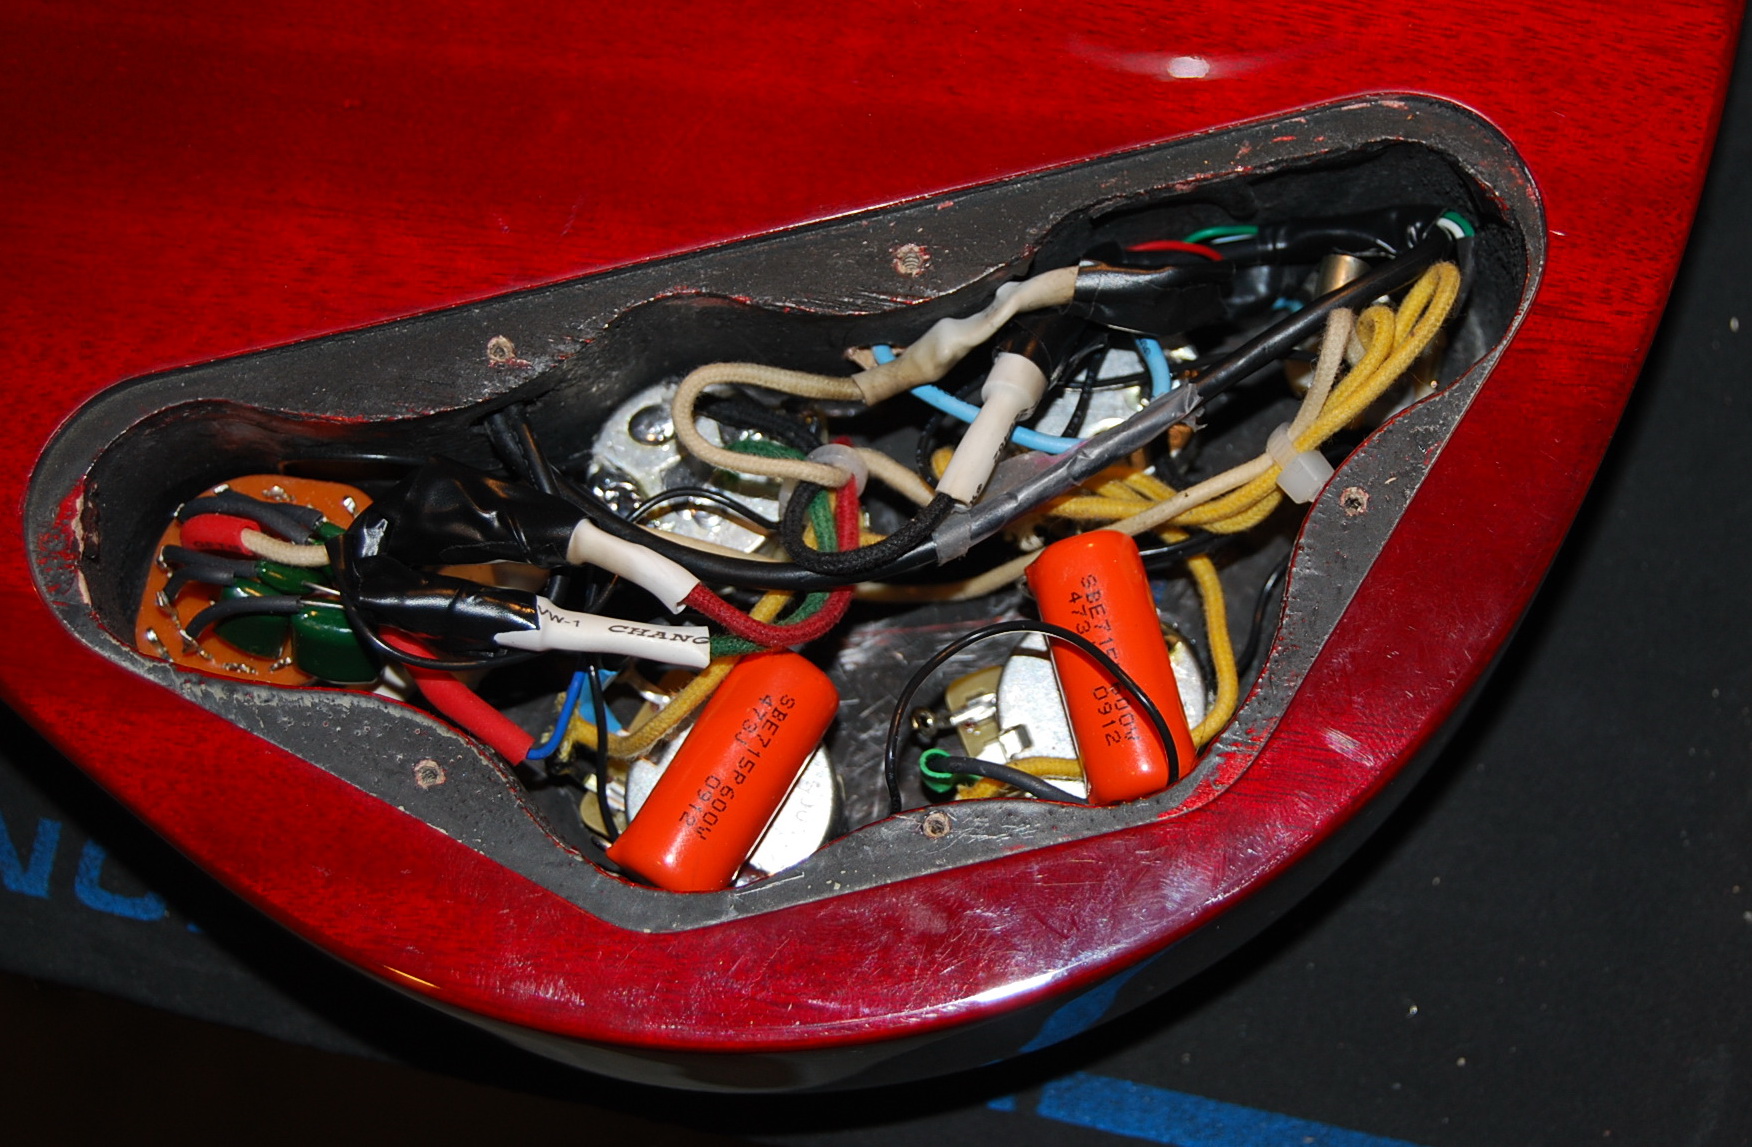
Wired up! (In with the new) Ready for a test run.
Screw the control cavity cover plate back on, flip the bass over, mount the pots, knobs, and chicken head varitone knob and we’re set for a test run.

Epiphone EB3 with Rothstein Varitone circuit.
Postion 6 “bypass” left blank
Once again plug into my Ampeg B15R and power up. Nice!!!! Clear, deep, middy full, versatile, are some of the adjectives that immediately come to mind. Okay so here is the basic theme to the varitone. Position One is quite trebly and can actually do a good approximation of a Chris Squire Rickenbacker Bass; clean and deep but also with just a bit of EB3 darkness thrown in. From there as you progress through to position 5 the treble slightly attenuates and the midrange becomes accentuated. Position 5 gives you considerable “bark” and it is so satisfying it might make even Jack Bruce smile!! Position 6 is true bypass meaning that as the varitone circuit is disengaged, there is no defaulting coloration to the bypassed tone. In bypass, it is as if the varitone circuit was never installed.
Bear in mind that with this circuit, even tiny adjustments to the volume and tone mix can yield some very unique tonal differences and because you decide what pickups you want on with the volume control you can even varitone a single pickup, or any combination of both pickups together. The tonal possibilities are quite endless!!
All in all, I could not have been happier with how things came out despite it added another $150.00 to the price of admission.
Next up, Part 2; bridge replacement.